

How To Run a Legion Tournament Using Game Uplink
Background
Until October 2022, Tabletop.TO was the definitive tool for tracking tournament progress, creating pairings, and more for Star Wars Legion tournaments. While unfortunately Tabletop.TO has since shut down, out of the ashes rose a new and even better tool built from the ground up for Legion - Game Uplink.
Game Uplink was made as a collaboration between several legion community pillars including the Fifth Trooper and 6up Supply, and has had Legion in its DNA from its inception. Anyone looking to run a legion event should familiarize themselves with this tool and this guide is the perfect place to start!
Step 1. Make an Account
It’s free and easy to do. Go to the site and click the button that says ‘Test the Beta’, or go directly to the legion beta at https://legion.gameuplink.com/ (Side bar - While the software is still technically in beta at the time of writing, it is stable, highly functional, and is perfectly safe to use. I’ve already used it to run an event and it went off without a hitch. The Game Uplink team has lofty goals for all of the features they plan to add, but the core is solid and ready to run your event). Click the button in the top right, and enter your information in.
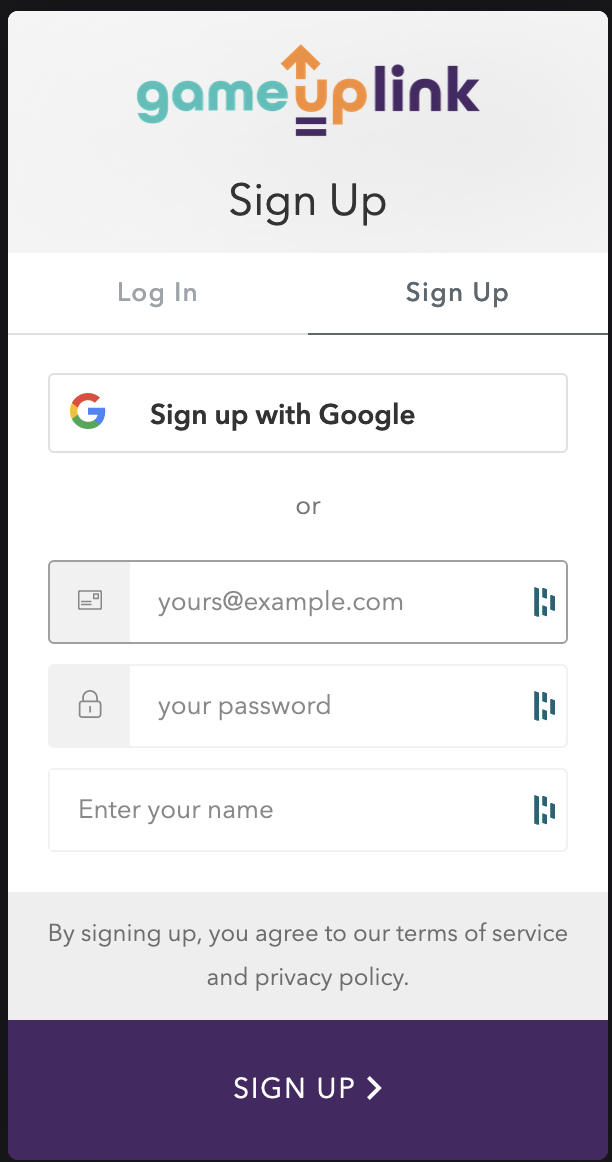
I’d recommend using an email you actually check vs a junk or throw away account. After you make your account and confirm your email address, go back to the site and log in.
Step 2. Lock Down Your Event Details
You’re almost ready to rock and roll. Before creating your event in Game Uplink, make sure you’re prepared with some basic information about your event. Specifically, you should know:
The event name
The time, date, and location
The player cap
A basic description of the event, including how many rounds you will play, what tie breaker you will use, etc.
Optional - Consider making a tournament document. This document can cover more details including set up info, a full schedule, prize support, and more. A tournament document goes a long way for fielding questions you will inevitably get. (Is painting required? Where do I sign up? When is lunch?)
Optional - Consider making a banner image for the event. Images help with grabbing people’s attention when you advertise the event, and you can use them in more than one place. Search the web for your favorite Star Wars image, then use a tool such as GIMP, Photoshop, Powerpoint, or an app on your phone to add text over that image with the event name and date.
Step 3. Making the Event in Game Uplink
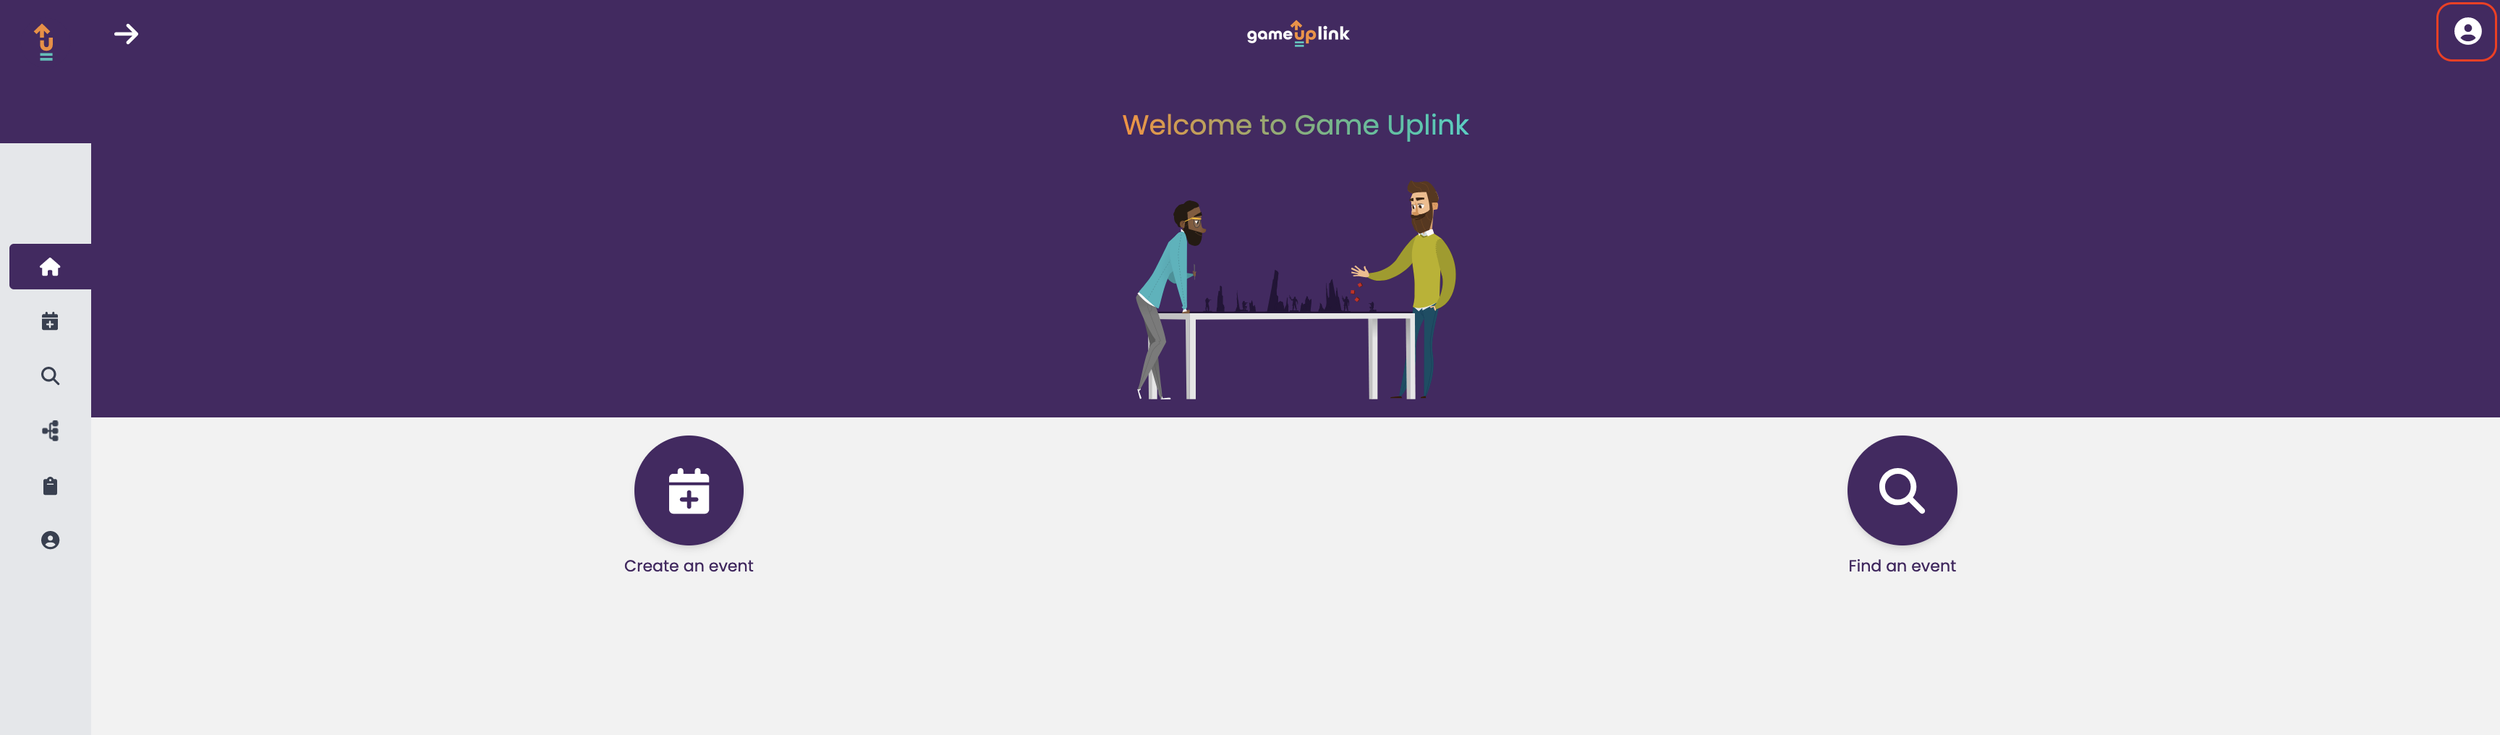
From the home screen, click the 'large ‘Create an Event’ button on the center of the page. That will immediately take you to a screen where you can input the basic information about your event.
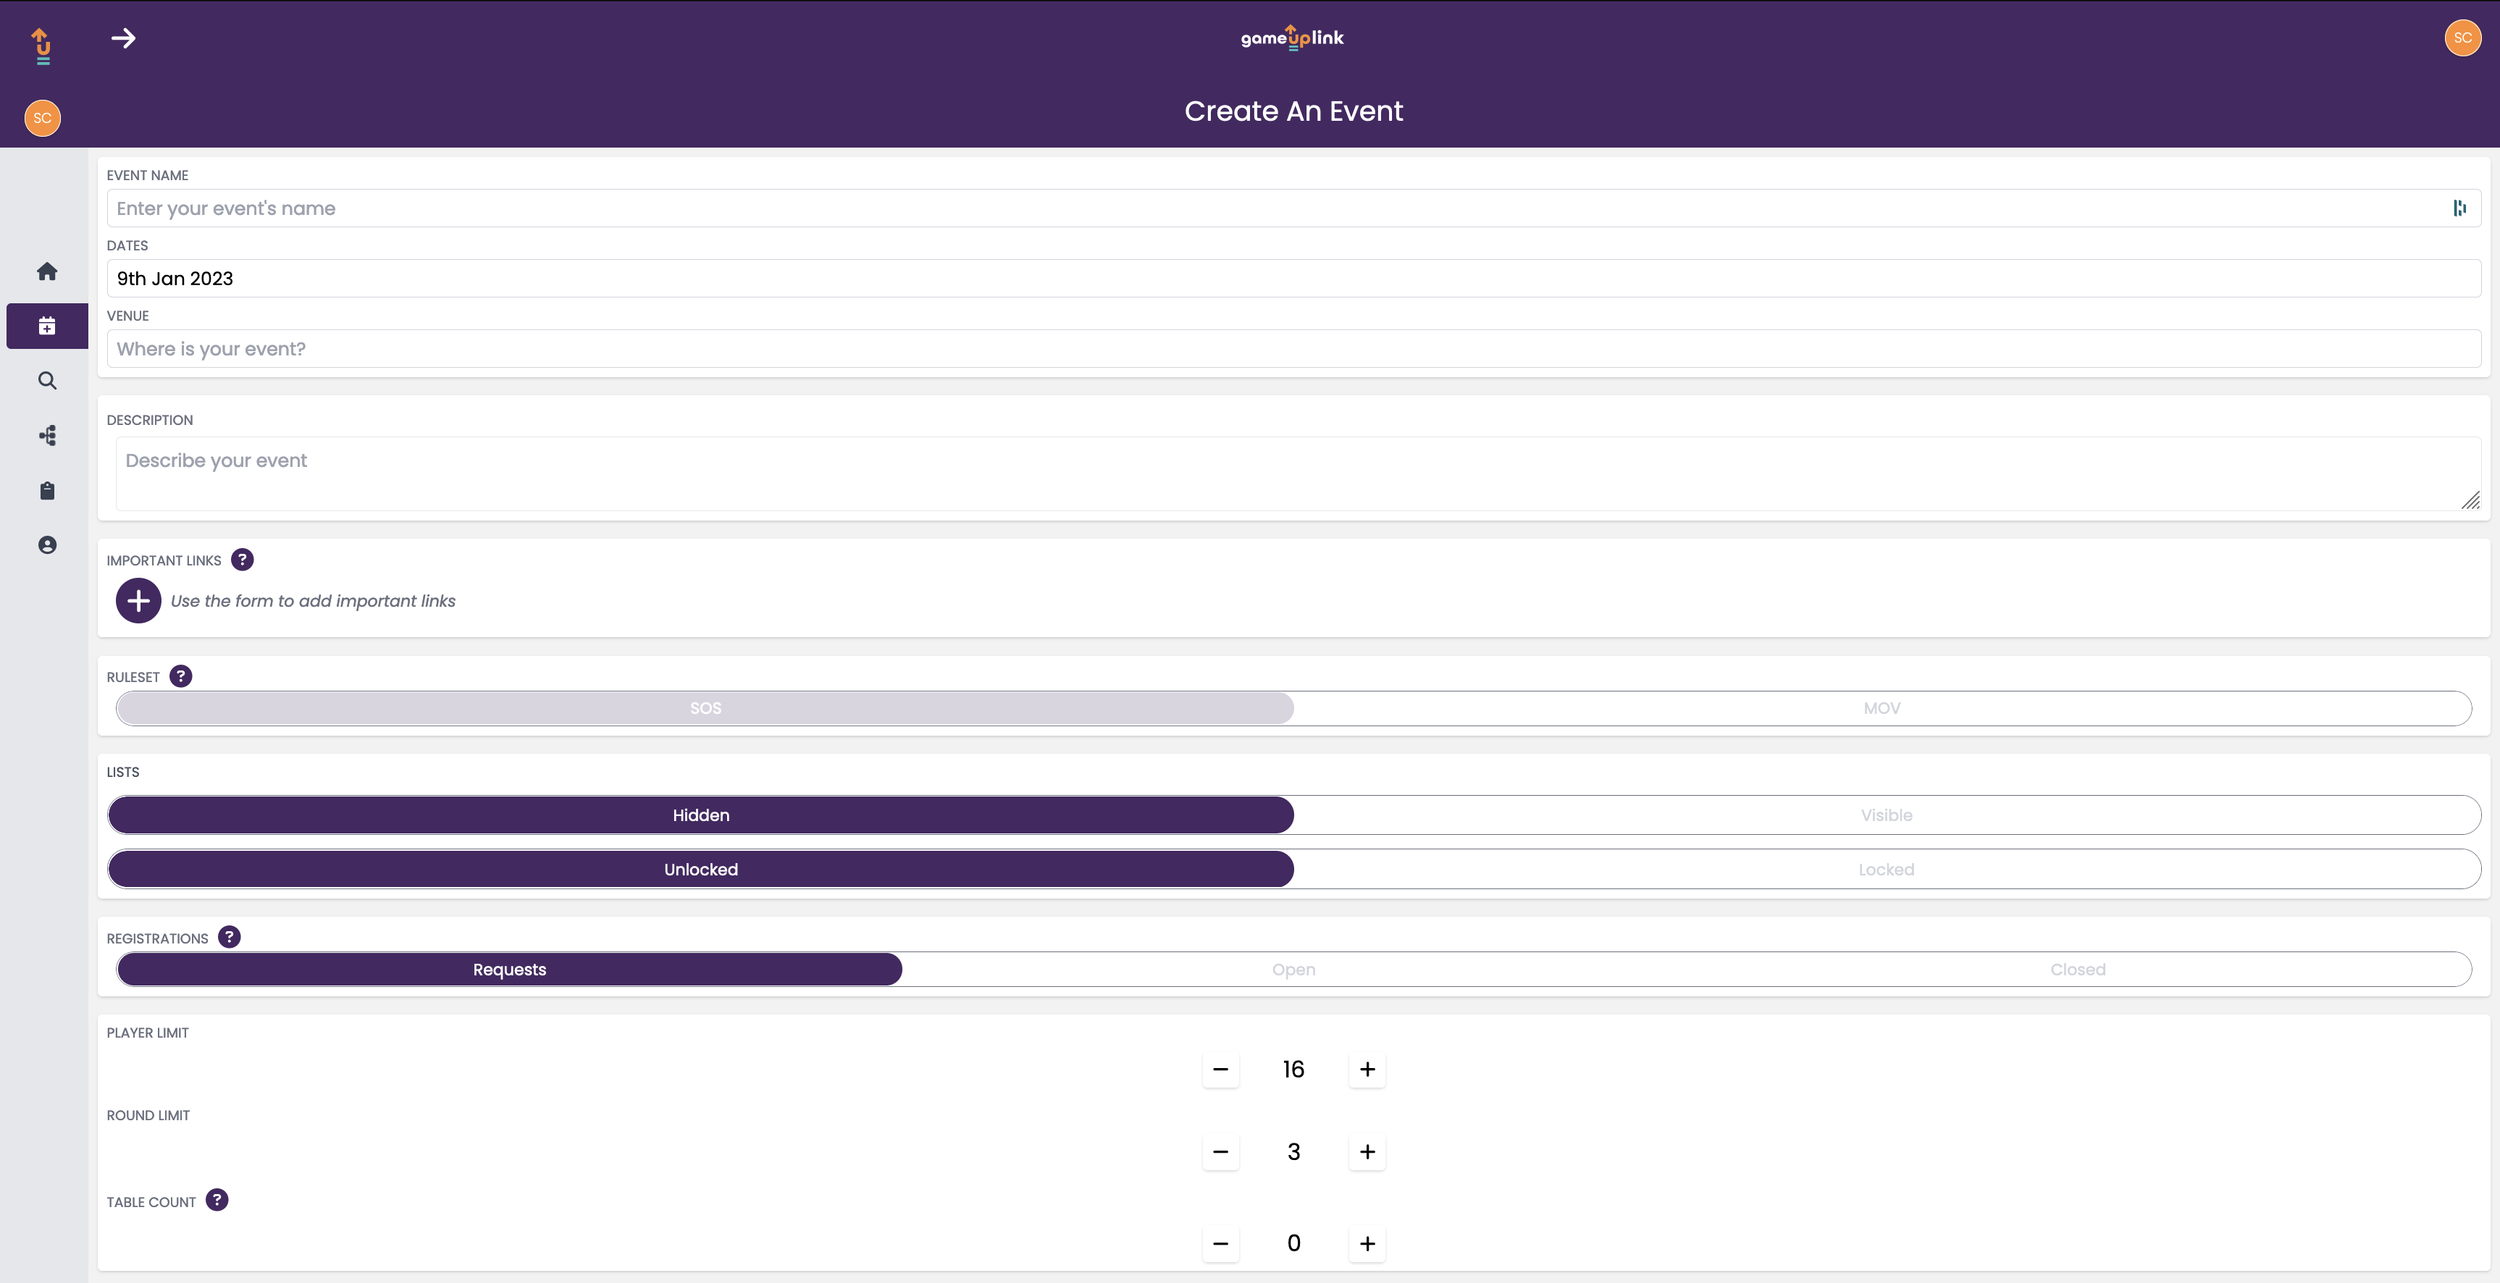
Completing the required fields here is fairly straight forward, but there are a few tips worth sharing.
Include the 101 in your event description - Are you playing 800pts or 500pts? How many rounds? Do you only need to register on Game Uplink or does the store/venue have a payment portal you need to complete as well? Who is this event for? You don’t need your entire event document to be in the description, but include enough information so people know the basics about the event at a glance.
Include important links! - An event document goes a long way, and I’d highly recommend everyone running an event include one. A simple way to achieve this is using Google Docs and sharing the link accordingly. Good news - you don’t have to reinvent the wheel! Many TO’s have made several documents you can reference for what to include. Here is a template for a local league that could be easily modified to fit your event. If you use the template, make a copy to your drive for you to edit. You can also reference other major event documents such as the document for the Front Line Gaming Rocky Mountain Open
Ruleset - This specifically referes to how the system will judge tiebreakers for players with a similar win/loss record. If you want to use Strength of Schedule to determine tiebreakers, select ‘SoS’. If you would like to use Margin of Victory to determine tiebreakers, select ‘MoV’. There are merits to using both systems, and which one is ‘best’ is an age old debate. Currently Game Uplink only supports SoS, but support for Legion specific MoV is planned for the future. Pick which system works best for you and your tournament.
Lists - You will want players to upload their lists to Game Uplink for you to review prior to the event for legality. This is one of the features that shows how Game Uplink was built for Legion, and is one facet where Game Uplink is far superior (already even in beta) to previous tools. Game Uplink defaults to what I’d recommend for your starting point - Lists Hidden and Unlocked. This will allow players to upload lists, allow the TO to see them, but will keep them hidden from other players. Typically, when a list submission deadline occurs, or for smaller local events, when the event begins lists, lists are switched to ‘Locked’ so they cannot be changed. Lists are typically kept ‘Hidden’ until an event is over to prevent other players from counter building lists that are already uploaded, but are switched to ‘Visible’ after the event to let everyone see what players used.
Registration - Again, Game Uplink nails it with the defaults. After you create an event, it becomes accessible to players via direct link (which you will share) and by searching for the event name on Game Uplink. When registration is set to ‘requests’ players can request to join the event, but will require TO approval to be added to the event. ‘Open’ lets players join in the event without TO approval, and ‘Closed’ prevents anyone from requesting to join. I’d recommend leaving this on ‘Requests’.
Limits - An easy one, set the number of rounds you will use and max players you can accommodate (typically limited by your venue). For tables - while you must have at least one table for every two players (sans one extra player as a bye), you can actually list more tables than you need and have Game Uplink utilize those to add extra variety. E.g. if you have 10 tables for your 20 person event, but two players drop the morning of the event, leave it as 10 tables. That way, players get to utilize all 10 that you set up versus only playing on tables 1-9.
After completing all of the necessary fields, click the large purple ‘Create Event’ button at the bottom. Congratulations, your event is live! Your work (and this guide) aren’t quite finished yet however.
Step 4. Diving Into the Settings
This is another instance where Game Uplink continues to show its benefits compared to Tabletop.TO. If you’ve seen our previous guide on how to run an event in Tabletop.TO, you know there are a ton of settings menus that you have to dive into and tweak in order to have your event run properly. Game Uplink , however, does a great job at setting the defaults you probably wanted anyway. It’s still worth acquainting yourself with the menu and options you have as a TO, however.
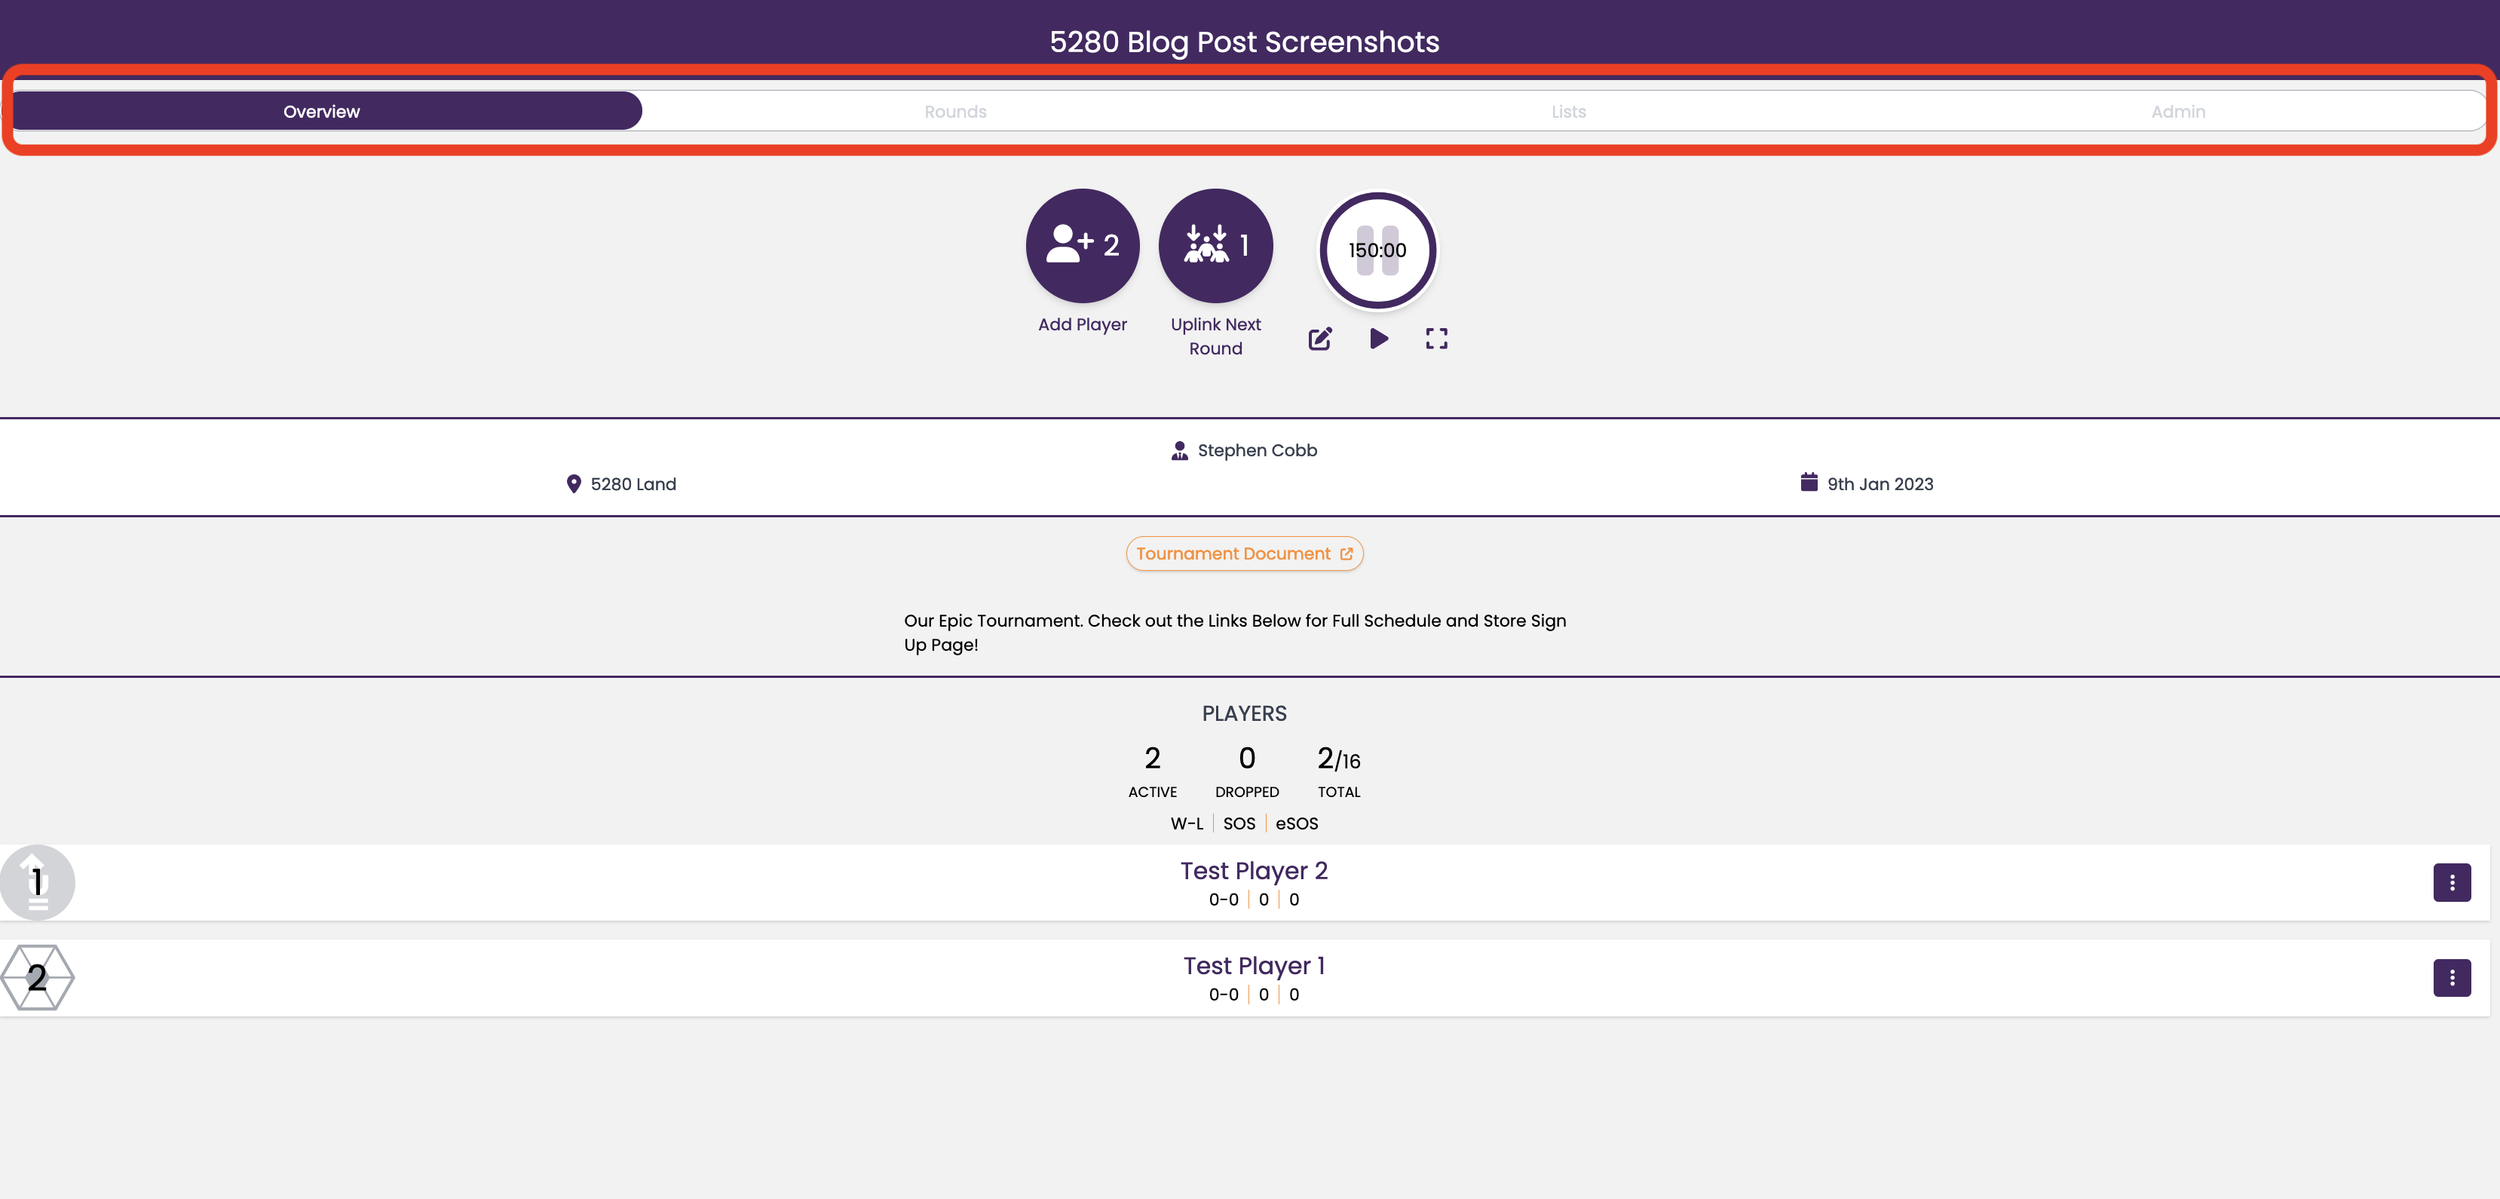
The key navigation tool you’ll is the menu slider at the top of the page.
Overview - the default page that does just that. In the circle buttons at the top you can manually add players, fire off the next round of pairings, and interact with the round timer feature (which defaults to the legion standard of 2.5 hours or 150 minutes). Below you can see the basic information you input and the links to any documents you included. Finally, you can see an overview of the players in the event,along with their rank, record, and their lists faction icon if they’ve uploaded their list!
Rounds - before the event has begun, this has a button to create pairings for the next round. When your event is in process of finished, you are able to see the pairings and results of each match for each round of your event.
Lists - for players, this tab allows them to upload their list link and change their list. For TO’s this tab allows you to review all lists. Side bar - this is hands down one of my favorite features of game uplink that makes it far easier to review lists compared to any previous system.
Admin - lets you edit the basic event info you input while creating the event, lets you approve or deny registration requests, lets you drop or ‘check in’ (aka confirm) players, and lets you reset or delete the event.
Step 5. Leading Up to Your Event
Sign Ups
Now that you know the lay of the land, its time to advertise your event and get people to sign up! Post your event details, any images you have (this is one where your banner image can help), and the URL to your event on game uplink on social media. Players will need to make a game uplink account and then can click the large purple button to ‘Register for this Event’.
As players sign up, you will see their names populate in the ‘Admin’ tab under the ‘Registration Requests’ section. If you set registration settings to ‘Requests’ you will be able to approve or deny sign ups here. When you approve a sign up, the player will be added to the event properly, will appear on the ladder in the ‘overview’ tab, and will also be allowed to upload their list.
A quick side note - One of your primary jobs as a TO is to remind people to sign up and register for the event. While for major events, registering online and uploading a list well before the event is expected of players, for local store events, you’re lucky if 100% of your players sign up online beforehand. Many store events support players ‘walking in’ the morning of, which is great for the flexibility it offers locals, but unfortunately it also subverts your ability to have all of your of players set up on Game Uplink before hand. This is okay though, and you can register players the day of fairly quickly. Expect to do this anyway for walk ins and last minute stragglers, but strive to get as many players signed up beforehand as possible. The way to manually add players is either on the ‘Overview’ or ‘Admin’ tabs, click ‘Add Player’ button and a pop up will appear. Type in the player’s name and email to add them in. Viola!
Lists
As lists are uploaded closer to the event, one of your jobs as the TO is to check them for legality. In the age of list building apps, this should be fairly easy, but is still a worthwhile exercise. To upload a list, players simply navigate to “Lists” tab and they will see the following:
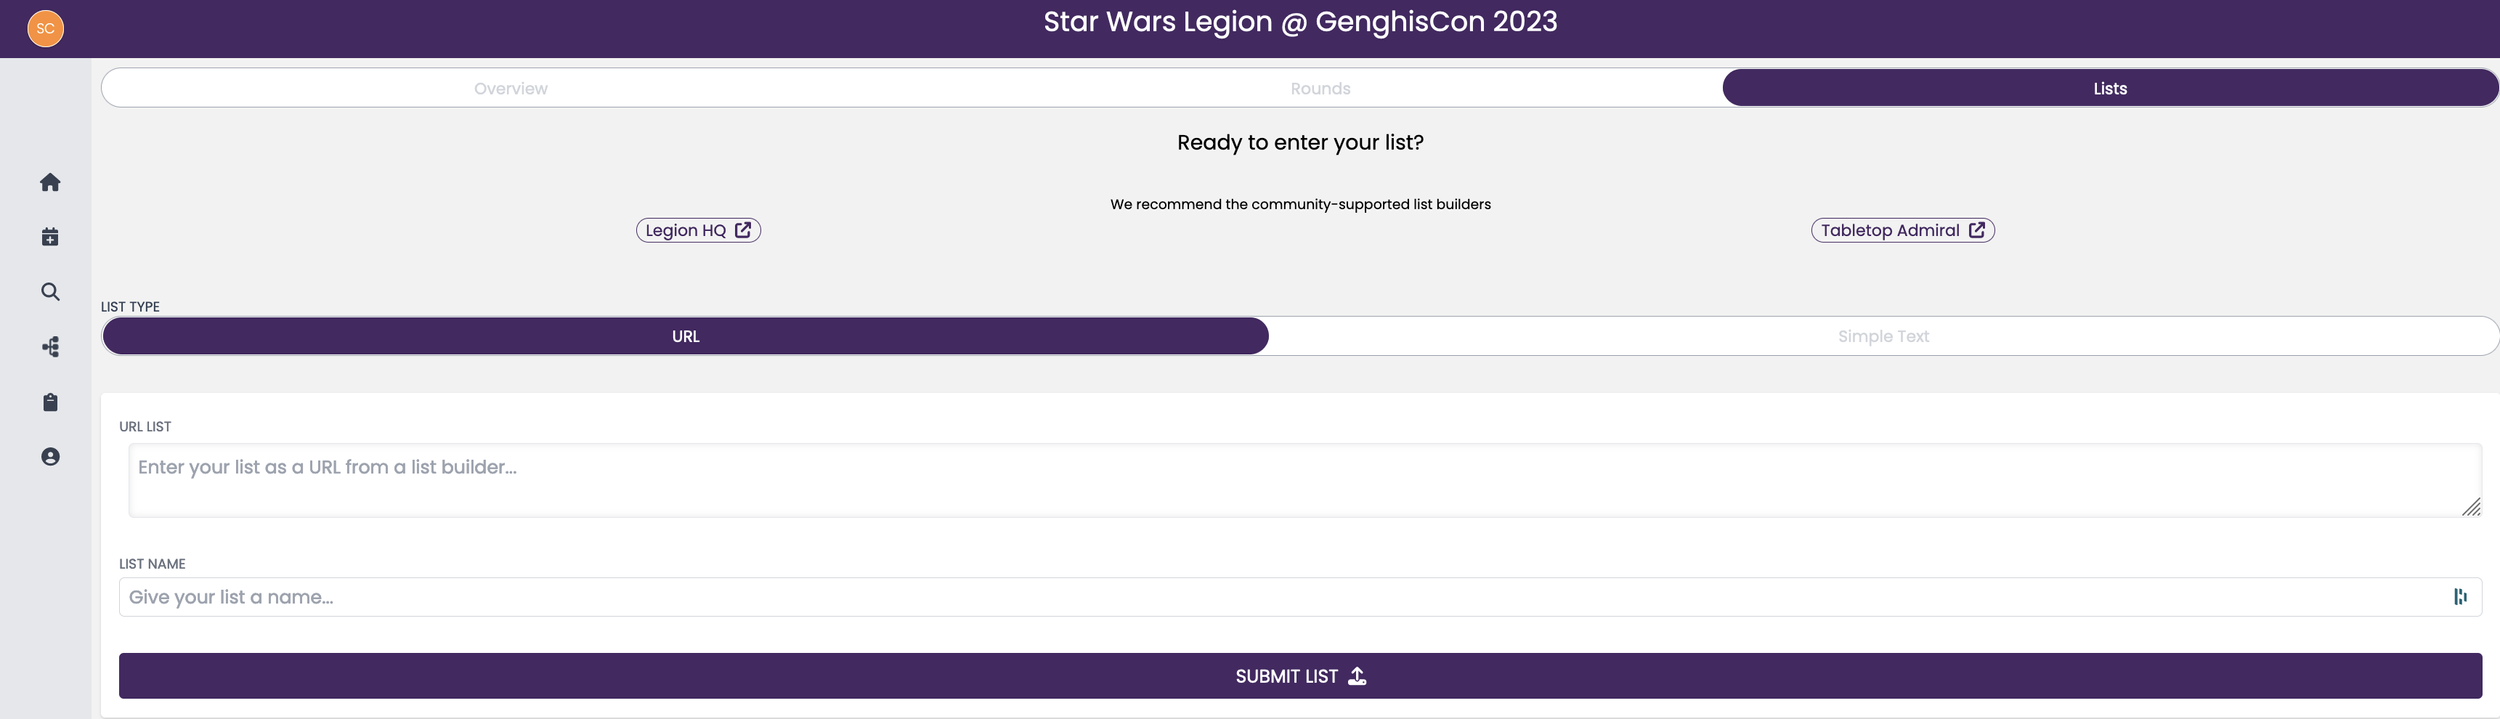
Having players submit their list via a list link from Legion HQ or Tabletop Admiral is STRONGLY preferred, and you should encourage your players to do so. List links offer several benefits over text based lists, such as allowing tools like Legion Stats to scrape the data from your event and generate cool charts and statistical summaries that you and your players will enjoy. List links also make auditing lists as a TO easier since you can lean on the list builder (somewhat) to help you check lists for legality and accuracy versus doing the process manually over a text based list. For players who still want to upload text lists, however, that option is available as well.
As you get closer to your event, you will want to review lists for legality and accuracy. As a TO, when you go to the ‘Lists’ tab, you will see a list of all players that have been accepted into the event. If the player has uploaded their list, you will see their faction icon on the left along with an arrow on the right allowing you to ‘expand’ the section to see that player’s list. If that player has not uploaded their list, you will see the notice ‘Awaiting List Submission’ along with a button on the far right that allows you to upload a list for a player. If a player has uploaded a list, when you click on their name, you will see a quick rundown of their list along with a link to view the list in its respective list builder.
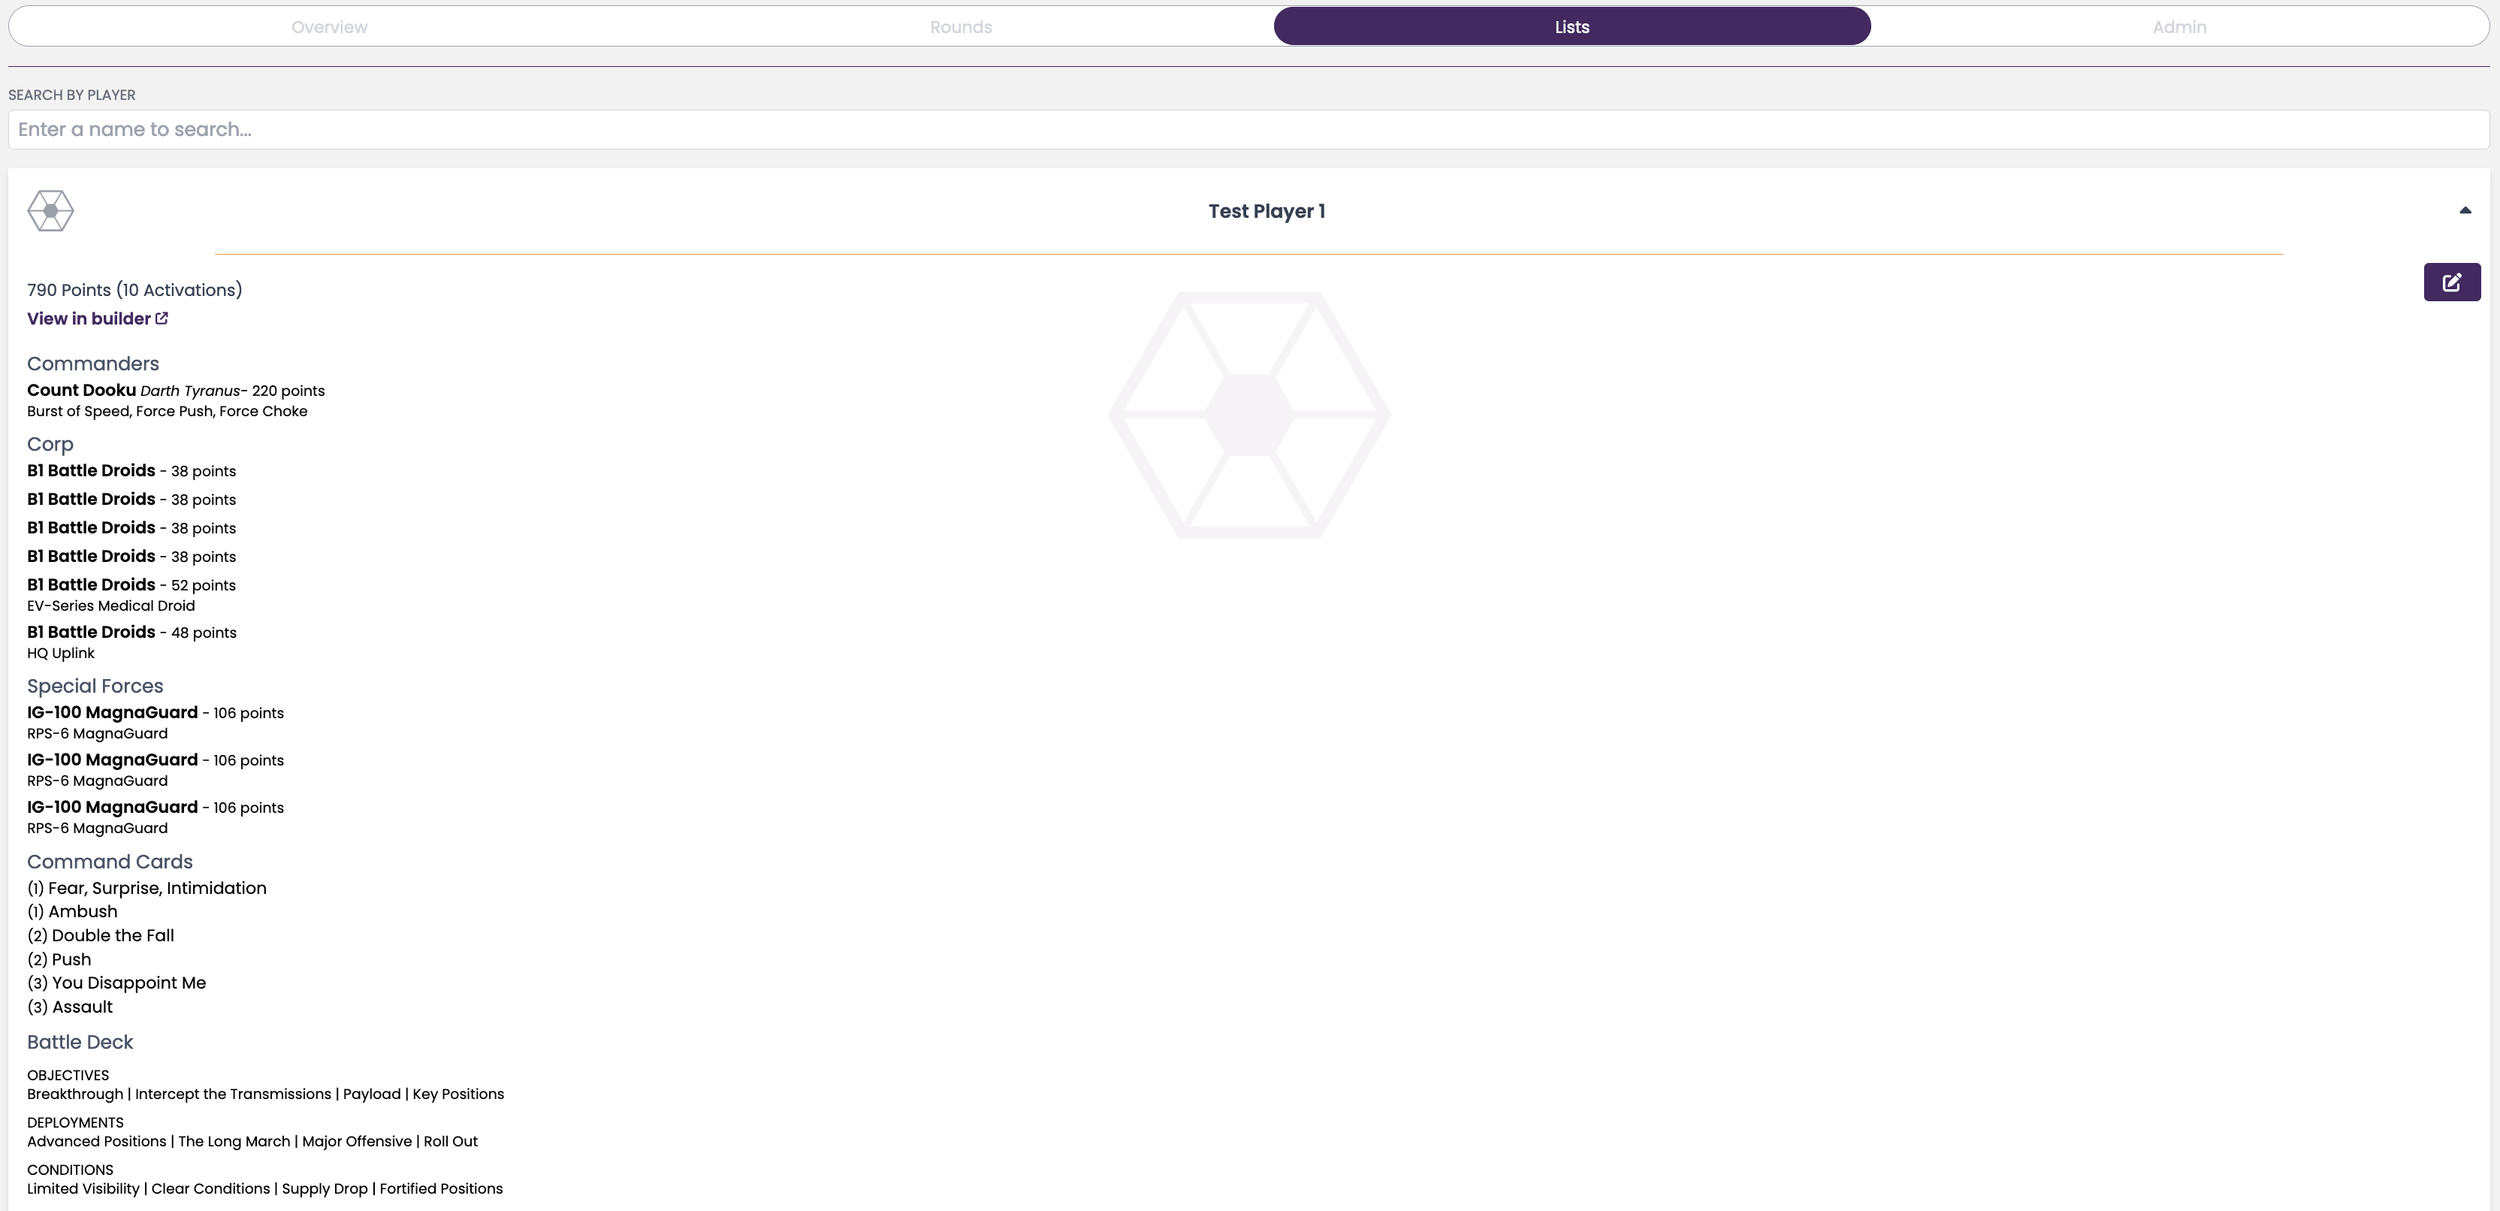
TO’s who have done list review in other software will know that this is an incredible improvement compared to previous systems (which typically involved copy and pasting links into dozens of tabs). When reviewing lists, common mistakes you will see are often minor - such as forgetting to include battle cards or command cards. More recent mistakes I’ve seen involve battle forces or mercenaries (such as forgetting to include a copy of ‘Underworld Connections’) since those rules are relatively newer and nuanced. Be aware that players can update and change lists as frequently as they want as long as they are ‘unlocked.’ For local casual events, I will usually leave lists ‘unlocked’ until the morning of the event to allow for maximum flexibility. For larger events and conventions, lists will typically lock well in advance of the event to allow TO’s sufficient time to do a full review.
The Night Before
The night before your event is typically crunch time for a TO. The more work you can do in advance, the easier the morning of your event will be. The night before your event:
Check for as much completeness on Game Uplink as is possible. Again, with local events, expect a few stragglers. The more you can get set up the night before, the easier your morning of will be. If possible, sending a direct message to players who haven’t registered or uploaded their lists can pay dividends.
If possible, try to set up tables and terrain with your store before your event. Depending on their schedule, many game stores and venues will let you set up terrain the night before the event, often closer to their closing time. Unless your event is small (as in <4 tables total), don’t try to do this by yourself. Setting up tables for good play-ability takes consideration and time, and you will need help. Otherwise the process will take you hours. Ask for volunteers the week before, and if people are volunteering their terrain for your event, ask if they can set it up (no one can set up a table faster than the person who plays on it the most!). Having multiple sets of eyes on each table and looking at each table from each board edge is invaluable. It can help catch less than ideal set up such as large walls that limit play-ability, terrain that prevents the movement of certain vehicles (look out for GaV’s and ISPs), and terrain set ups that make certain objectives dramatically one sided. Make sure to use your measuring tools to check table center (for KP, recover the supply, intercept the transmissions, etc.), and other relevant spots on the table for play-ability.
Number your tables. This will help players identify where they are supposed to play when they are paired.
Prep what you need to take to the event so you don’t have to worry about it in the morning. Some essentials are:
Your own set of measurement tools, movement tools, silhouettes, and a potentially a laser to assist with judge calls.
Your prizes! If you’re awarding prizes, lay them out, make sure you know what prize is being awarded for what (best painted, winner, best in faction, etc).
While not required, I find bringing extra cards and models with me can be a life saver. Players will inevitably forget things, and while its not your responsibility to cover for them, you can make someone’s day a lot better when you come to the rescue. Common forgotten items I see are order tokens, dice, objective tokens, and command cards. I bring my card binder and tackle box of components with me and find myself loaning them out almost every event to assist.
Super glue/plastic glue - models break and people will ask!
Water and snacks! While you aren’t playing, staying hydrated and keeping your blood sugar up is essential.
Step 5. Kicking off the event
You’ve made it to the morning of the event and its time to get things rolling!
As players arrive, check them in on Game Uplink. To do this, either on the ‘Overview’ or ‘Admin’ tab, click the purple button with 3 dots next to that players name and select ‘Check In’. It’s also a good idea to triple check that they have uploaded their list. If they haven’t ask them to do it ASAP.
For any walk ins or new additions, have them register on Game Uplink, or you can manually add them to the event using the ‘Add Player’ button at the top of the ‘Overview’ page. Ensure they upload their list as well or have them send it to you to upload.
After everyone has arrived, audit your list of players versus your ‘ladder’ of players on the Overview tab. Make sure everyone who is at the store is registered on Game Uplink and is checked in. If anyone is registered online but has not checked in, try to follow up to assess if they’re coming or if you need to drop them from the tournament. (Day of drops are common, life happens). To drop a player, either on the ‘Overview’ or ‘Admin’ tab, click the purple button with 3 dots next to that players name and select ‘Drop Player’.
Triple check your event settings. Go to the ‘Admin’ tab and under the ‘Tournament Structure’ section, confirm the number of rounds and number of tables listed is accurate.
Lock your lists. If you haven’t already - go to the ‘Admin’ tab and click the ‘edit’ button on the top left of the ‘Tournament Info’ block. Toggle lists to ‘locked’ (but they should still stay hidden until after the event).
Before rolling pairings, the TO usually makes announcements. Reviewing the schedule, clarifying who the judge is, going over any paint competition details, etc, and setting overall expectations for your players is advisable. If you have newer players, I like to give some advice on talking out their moves before making them, and I also let them know that calling a judge is common and is always preferable over debating your opponent. If line of sight, cover, etc. is hard to determine, just call a judge! Additionally, it may be useful to highlight the features players can use on Game Uplink such as seeing their pairings, seeing their assigned table, seeing their opponents list, checking the remaining round time, and submitting their match information after their game is complete.
Finally, its time to kick the first round off and roll pairings!
Rolling Pairings
Navigate to the ‘Rounds’ tab using the slider at the top and click the ‘Uplink Round 1’ button in the center of the page. This will generate a preview of the round before it is published for players to see.
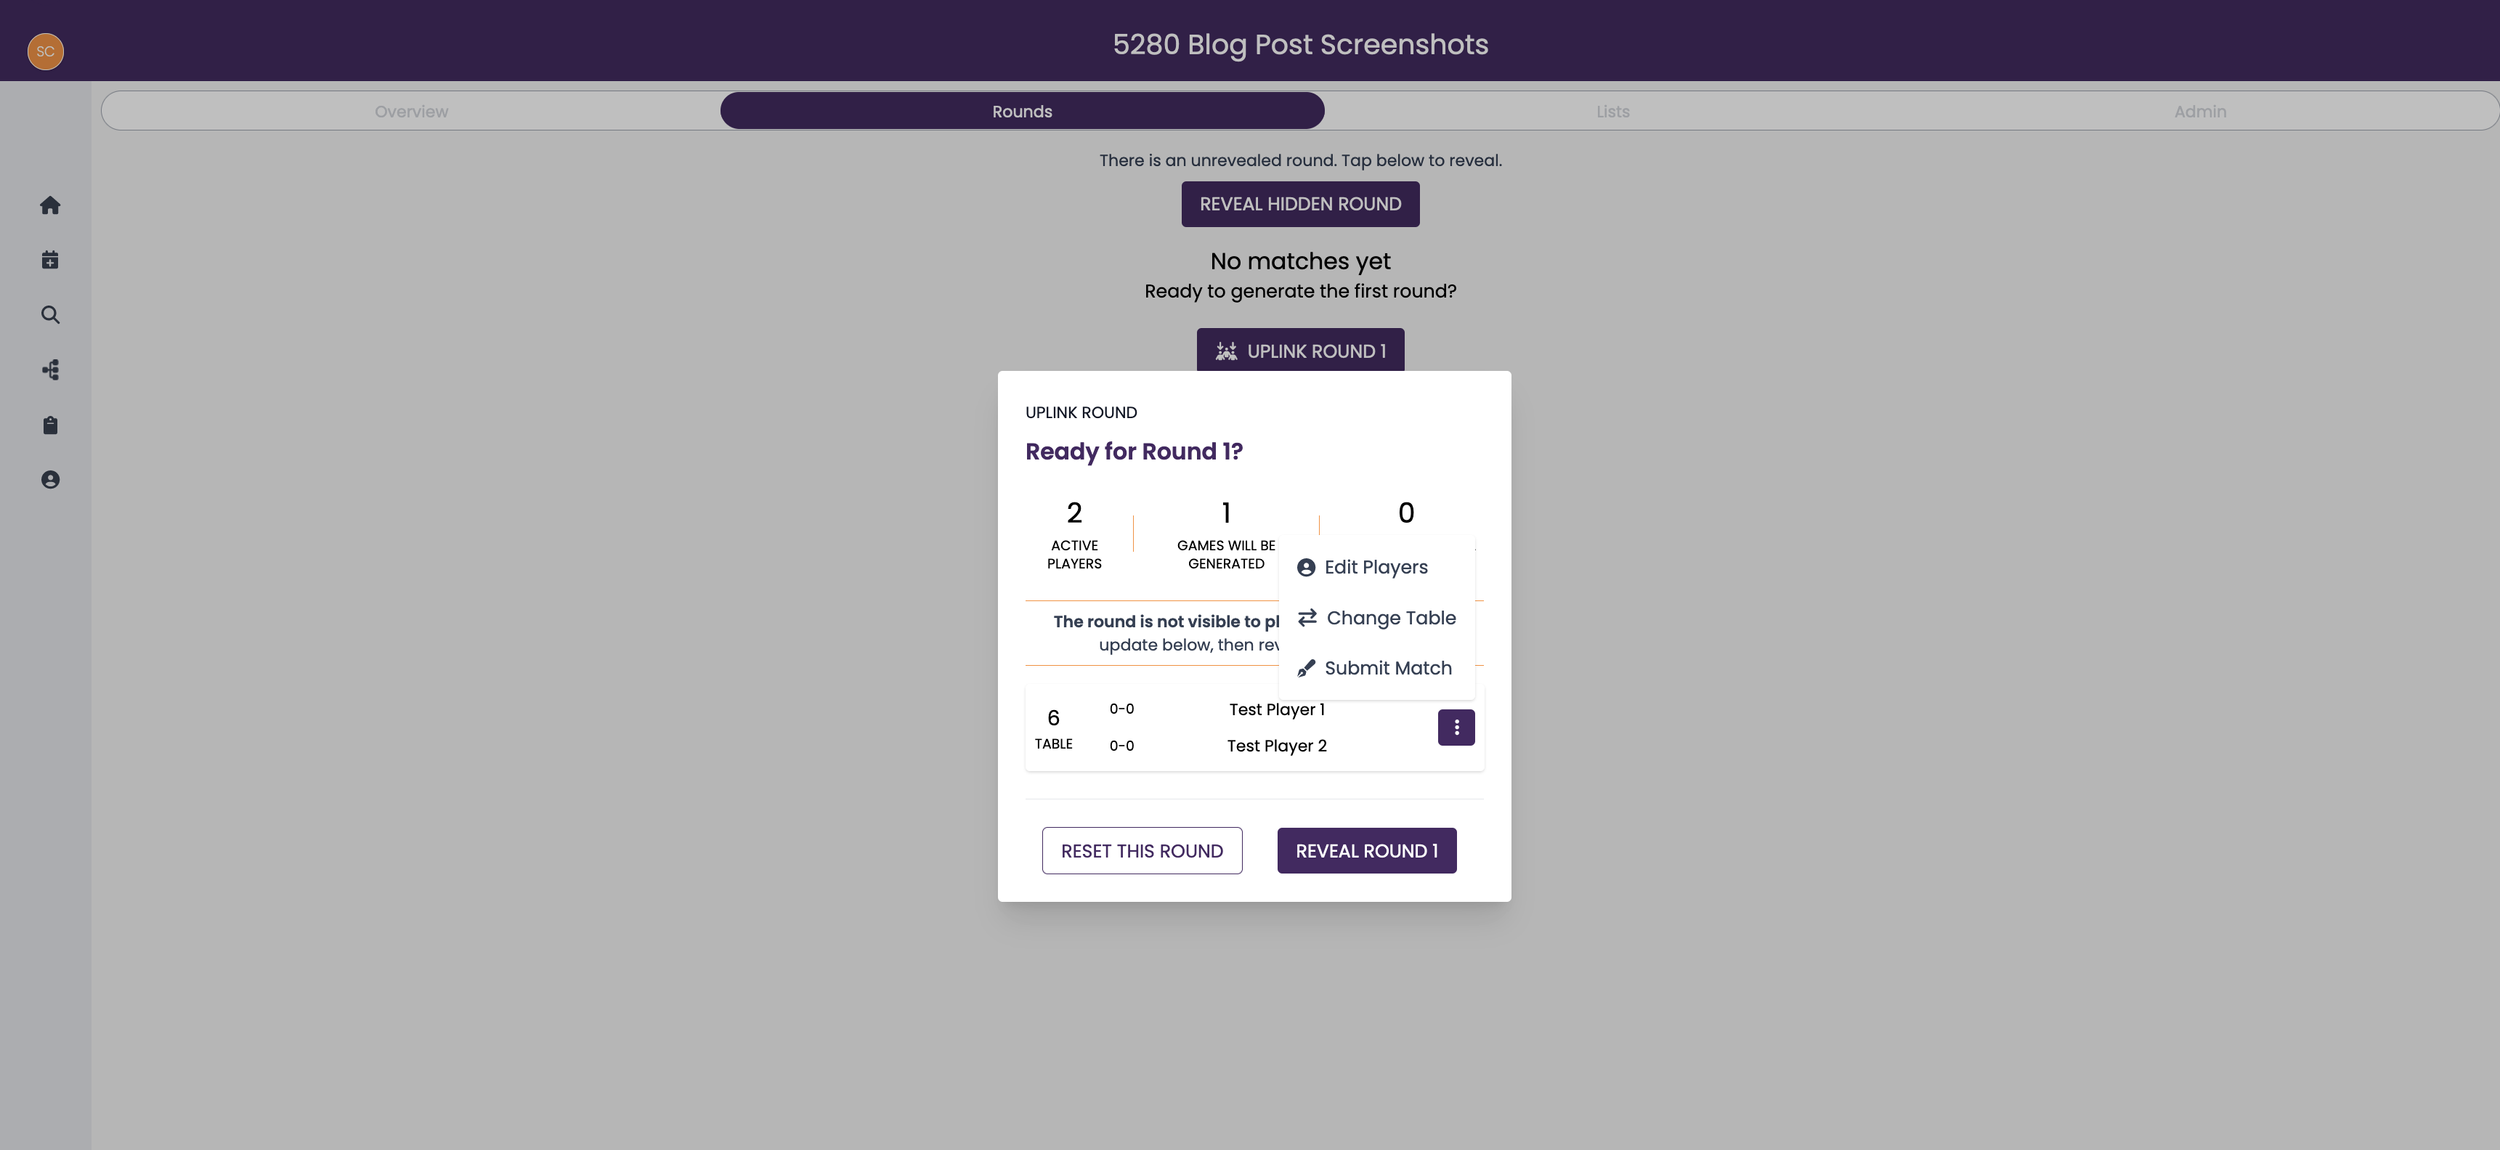
This round preview is another amazing Game Uplink feature that could save you from a bunch of potential headaches. Review the round 1 pairings for issues or errors. If you need to make any changes such as editing players or swapping tables, click the purple button with three dots to the right of the pairing to see a list of options for editing the round. When everything looks correct, click the purple button at the bottom of the preview to ‘Reveal Round 1’. This will kick off round 1 and allow players to see their pairings. The ‘Rounds’ tab will update to show the clock controls at the top, will have a purple icon for the current round selected (more rounds will populate as you complete and ‘uplink’ new rounds), and the pairings for the round will be shown below.
Player Tools
A quick note on the the tools Game Uplink provides to players in your event that they should utilize. On their own smartphone or computer, players can see their assigned pairings, what table they are playing on, and additionally can see their opponents list and bid! Game Uplink will strategically only show the player their opponents list without the battle cards, command cards, and other hidden information which is super helpful! No more need for paper lists! After you uplink round 1, players should check out this information on their phone and the TO should strive to show this data on their computer. Players should navigate between the three tabs they see, Overview, Rounds, and Lists, to see the relevant information accordingly. Overview will show players the summary of the event with the current standings and records. The rounds tab is how players view their own pairings, see the round timer, and submit results. The lists tab is where players can view lists. If players are new to Game Uplink, expect to get some questions and to assist with players with learning how to use this new tool.
The Round Timer
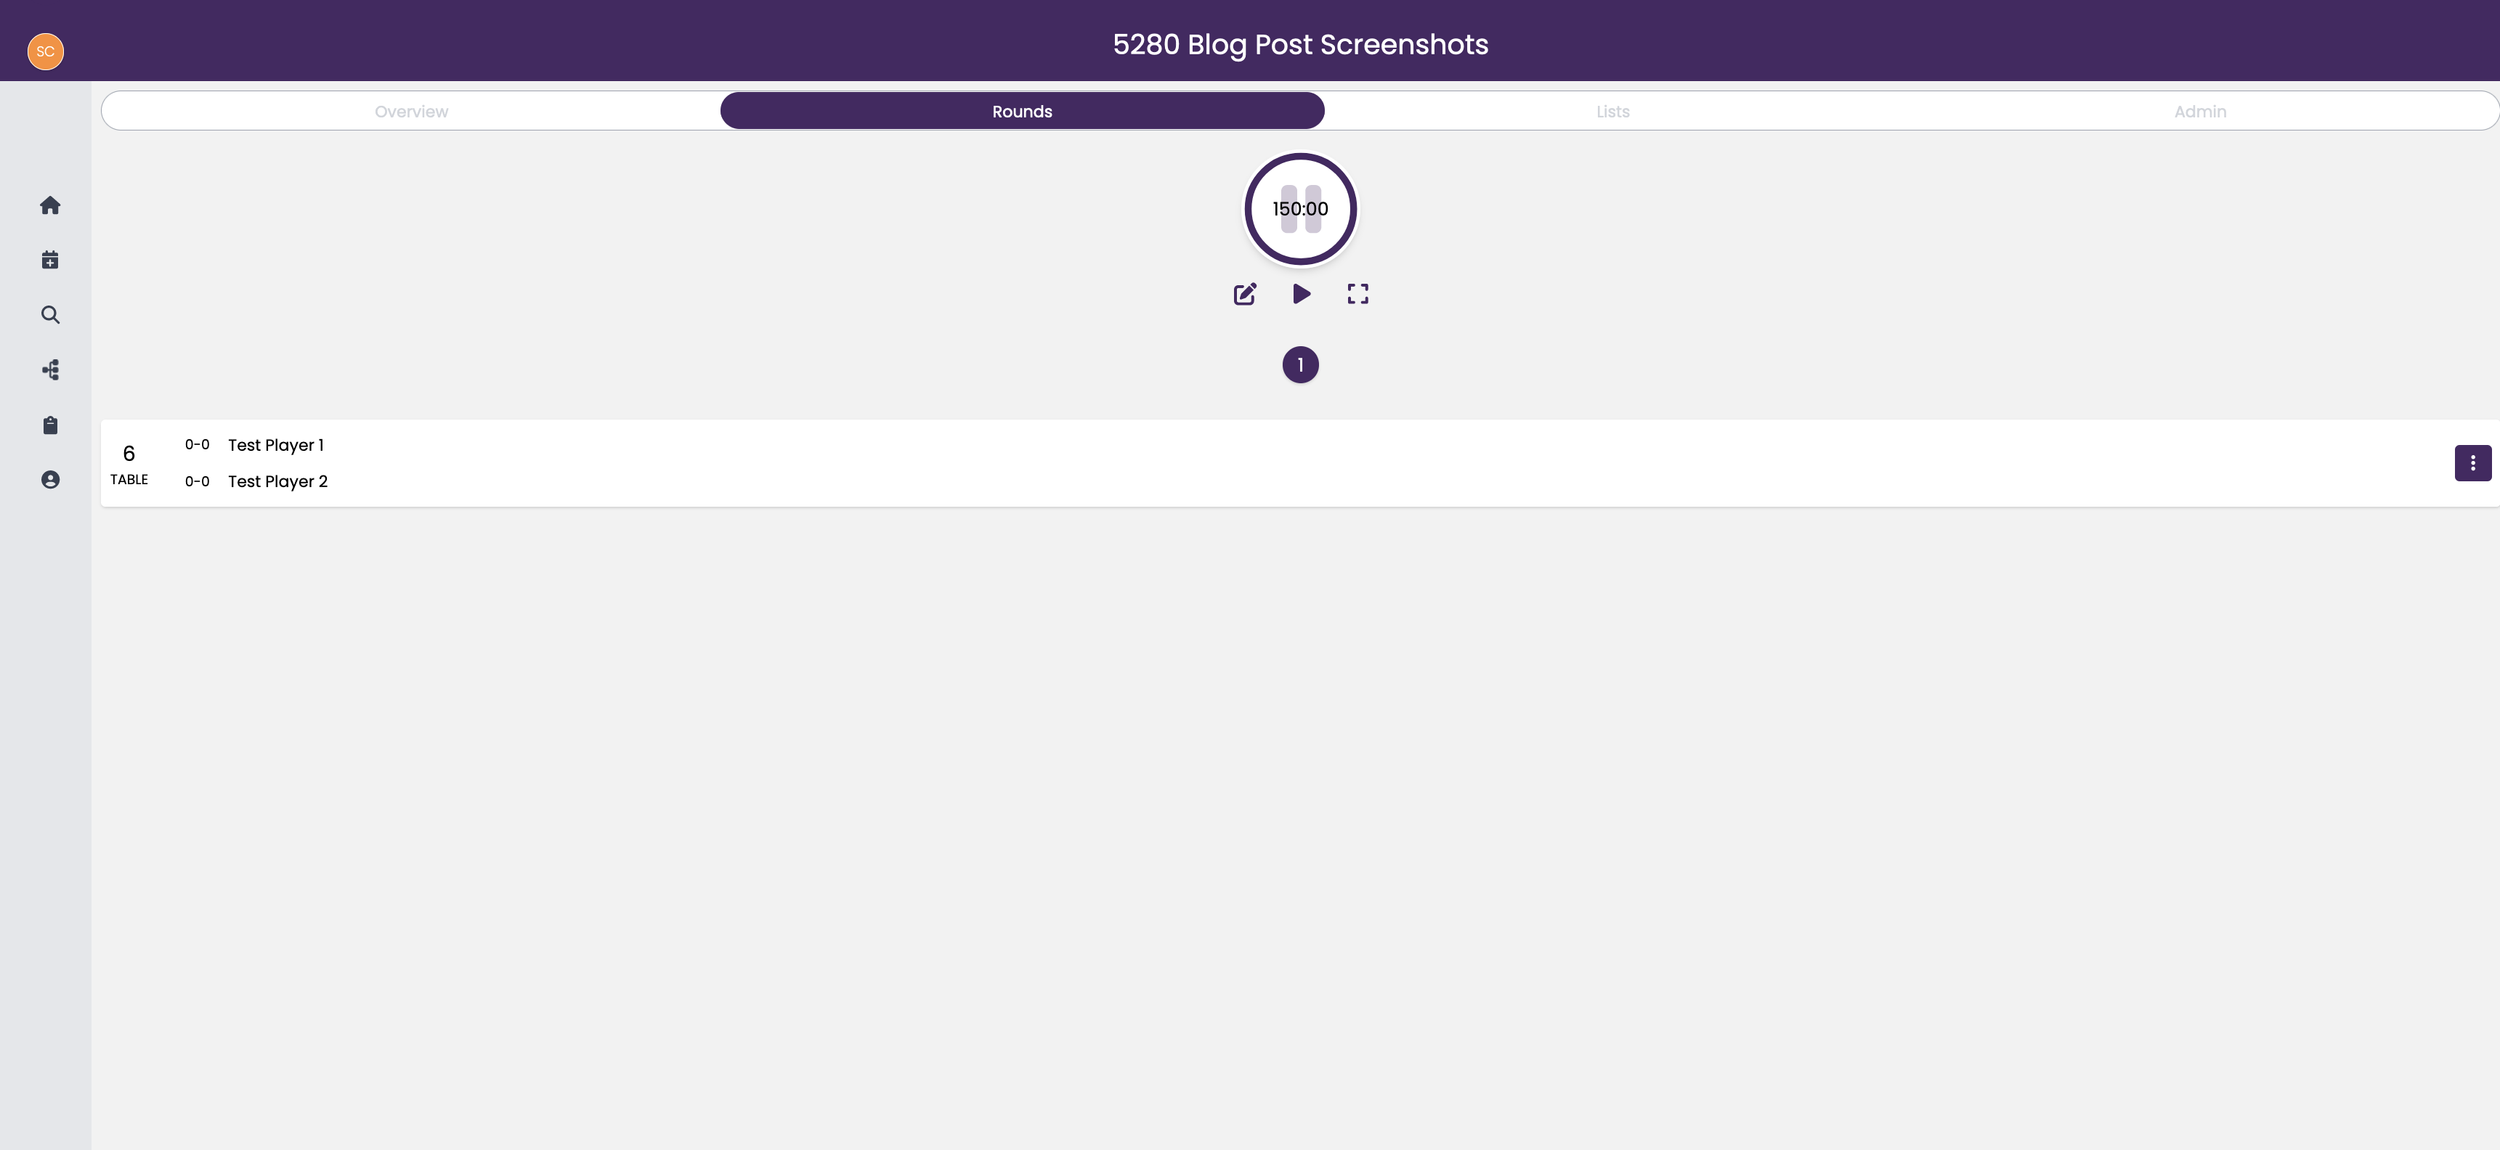
Its typical to give players a few minutes to check their pairings and to make their way to their assigned table before kicking off the timer for the first round. When you’re ready to start the clock, navigate to the the ‘Rounds’ tab to see the clock widget at the top of the page. The default is 150 minutes (2.5 hrs) which is the standard round time for competitive legion events. You can edit this using the button with the pencil icon below the clock. This will also let you reset or adjust the clock if any errors or issues occur. When you’re ready to start the clock, click the ‘play’ button under the timer. While players can view the clock on their smart device, often it is ideal to click the ‘expand’ button to the bottom right of the clock, which launches a new webpage that has a full screen display of the round time. I’ll typically leave this on my laptop screen for players to see, and if you’re lucky, your venue might have a TV or other display you can use to have it easily viewable for players.
It’s typical for TO’s to give feedback during the round on the time remaining. Frequent feedback on the amount of time left in the round is essential to helping players keep pace to finish their games in a timely fashion. I tend to make announcements every 30 minutes so players have plenty of feedback about their pace.
You’ve done it! The hardest part of your job is complete and now your event is off to the races. While the hardest part is now behind you, there is still work to be done.
Step 6. During and After the Round
At smaller events, the TO is usually the head judge. During the round, you should be walking around between tables observing play and answering any judge or line of sight calls players may have. I highly recommend having the Legion Quick Guide up on your device for quick rules reference. Try to spot problems or conflicts before they escalate, and help out where you can. This is also the fun part! You have a front row seat to a bunch of legion games that you get to watch unfold.
As games wrap up, players should report their results. They can report these directly to Game Uplink via their phone, or they can report their results to you for you to enter. To log a result, navigate to the ‘Rounds’ tab, click the three dots next to the specific match, and select ‘ Submit Match’. You will see the following pop up that asks you to input match information (more fun statistics!!)
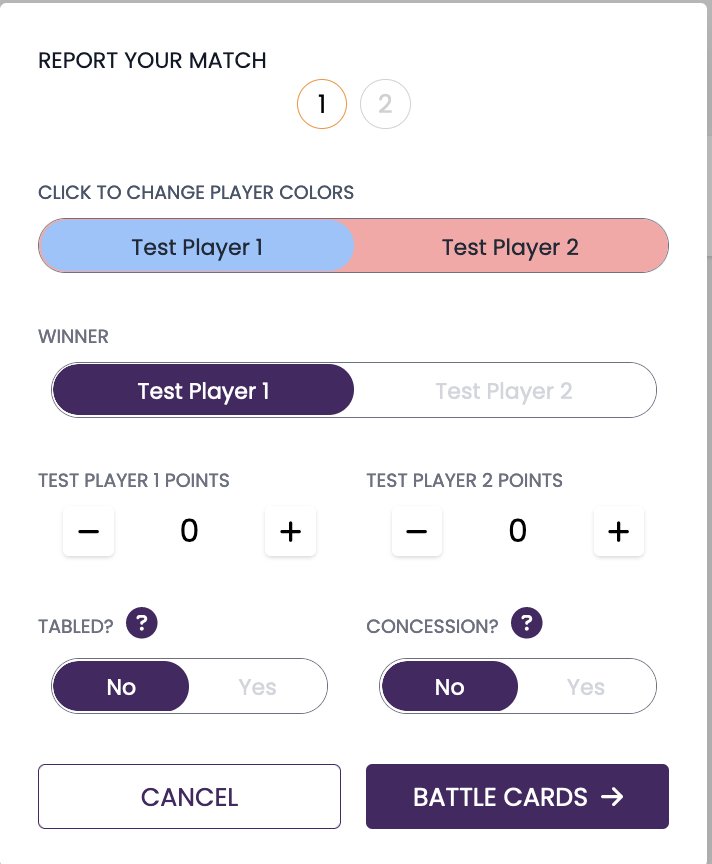
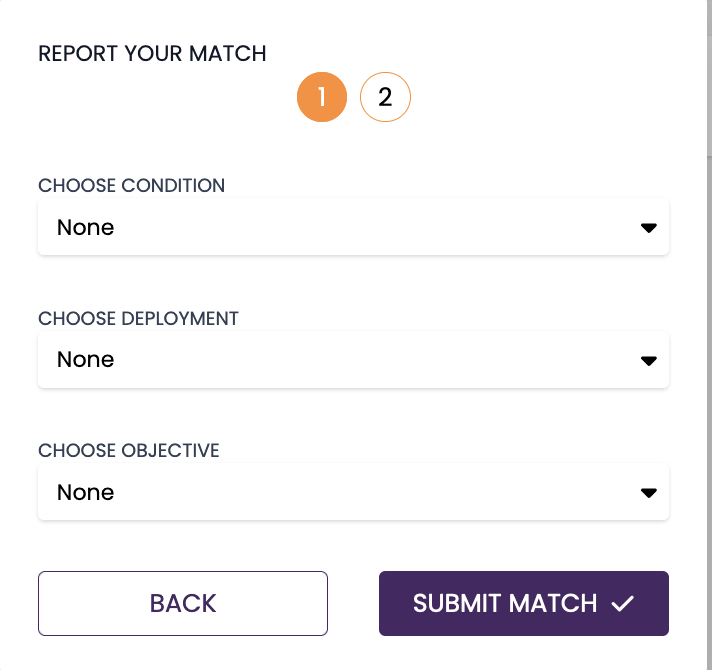
Page 1 asks you to input which player was blue/red player, who won, what the VPs were, and to identify if the match ended in a tabling or concession. The second page asks you to input the battle cards used. Ideally, players are submitting this information themselves, and as a TO, you will be asked to ‘verify’ the data to lock it in. If there are any errors - no worries. You can still edit this data after it has been submitted and verified. Repeat this process until all matches have been submitted.
After all match results have been submitted and verified, a purple button will appear at the top of the ‘Rounds’ tab that allows you to ‘Uplink Next Round.’ Clicking this button will show you the round 2 preview. If everything looks good, or after you make any edits, click ‘Reveal Round 2’ to have the round go live! The only difference you will see in the UI is that now the numbers 1 and 2 appear on the ‘Rounds’ tab, which allows you to toggle between the pairings and info for each round.
Repeat the steps above for round 2 and any subsequent rounds you have until all of the rounds you set are completed.
A few notes
Mid event player drops happen and it’s okay. If someone needs to drop, you can drop them from the ‘Overview’ or ‘Admin’ tab and Game Uplink will handle it without issue and will assign appropriate byes, etc. on subsequent rounds.
If something goes horribly wrong with a round, you have options. Go to the ‘Admin’ tab and scroll down to the bottom. Here you will see an option in red to ‘Reset Latest Round’ if you need to revert back to an earlier state.
Have fun! As a TO there are a bunch of things you can do to keep your event fresh and fun during the rounds. I like to hand out promos or other minor prizes during the round to keep players engaged and to incentivize players staying throughout the event. There are also other fun things you can do to make little mini games during the event. For example, our store had some promo acylic panic tokens from an early store kit for me to give out. During a round, I announced that the first few players to have units panic (and the player who made the unit panic) would get one. Now, instead of being bummed out that they had a unit panic, players were excitedly calling me over to claim their prize. The sky is the limit here and you can be as creative as you like!
Step 7: And We Have Our Winner!
When all round are complete, navigate to the ‘Overview’ tab to see your overall standings.
Typically the TO gives some kind of wrap up speech (thank everyone for participating and thank your store for hosting!) and then you give out awards. In addition to the typical prizes for the winners/undefeated players and your painting competition winners, I like to raffle off as many prizes as possible to incentivize participation. The glory of winning is often the best prize, so giving store credit and other goodies to everyone else is typically preferred.
Now that the event is over, you should ‘unhide’ the lists by going to the ‘Admin’ tab and clicking the ‘edit’ button on the top left of the ‘Tournament Info’ block. Toggle lists to ‘Visible’ . This way all of the players (and anyone who checks out your event later on!) can see what the top lists were and what their friends played.
Congratulations! You did it!
Step 8: Wait, there’s more?
Submit your event! After running your event, you can submit it to certain websites to have it logged for the community at large to see. This is a great way to advertise for your future events, and to let your players have some bragging rights about how they did. A few resources are below:
-TFT/Bushfacts North American ELO (Bushfacts periodically scrapes qualifying tournament data and updates this)
Players love seeing tournament results, tournament lists, and peering into the local meta of different regions, so consider sharing your Game Uplink event link on facebook and discord.
Written by: Stephen Cobb (@ASpaceViking)
Other Resources:
Provided by LJ Pena via the Legion Tournament Circuit and Team Relentless:
”Feel free to use any of these documents, but please make your own copy first! Don't edit muh copies!”
5280 Store League Document Template: a template for a local league that could be easily modified to fit your event.
Table Planning Document: https://docs.google.com/spreadsheets/d/1kZhvYRxj8V1697rxMzQ5P9tmW0KJ5tVsyINrWotEAD4/edit
Sample Packet: https://docs.google.com/document/d/1SlzPYn2g3aEJ69hsE3KLNO6O_v948aTzK-4-OaAZfx8/edit
Opening Remark Checklist: https://docs.google.com/document/d/1zDU1vLXBTknaZXG1Gfyh64XC5Docu3SIVRJUtOxSZuU/edit?usp=sharing
Match Slips: https://docs.google.com/spreadsheets/d/1SCA9FaUjcEUrWCxyi91O5Kx3lA0BtNPH1VPMUvHQai0/edit?usp=sharing
Planning and Prepping Tracker: https://docs.google.com/spreadsheets/d/1KVUByNzSLVRAmAZMLw2JctwjswzHjTHhfmsru2cpNzo/edit?usp=sharing
Rolling Presentation: https://docs.google.com/presentation/d/1uAYFy-sXvkw7hENH0Ced77oZCN8-Qv6_ve2_1KmQocc/edit?usp=sharing