

Turn Zero 101: Analyzing the Battlefield
By: Phil Samuels (@Phil)
While Star Wars Legion takes place over the course of 6 formal turns, many competitive legion players agree that a match can be won or lost before the first activation is made. The identification of terrain, selection of board edge, selection of battle cards and deployment of units all occur in what is commonly known as “Turn Zero”. This turn is vital to accurately place your units and plan accordingly.
One critical aspect of this is thoroughly analyzing the table - the terrain, the firing lanes, and more - and how you or your opponent may use them throughout the ensuing game. While it’s easy enough to do a quick analysis of a table and pick up a few tidbits of information, I find it extremely useful to have a structured process to go through to help ensure you do not miss any key pieces of information.
The military loves its acronyms (even though most of them I’ve completely brain dumped over the last decade), and one acronym in particular has been etched into my brain due to its sheer usefulness and its frequency of use. The acronym KOCOA is used for terrain analysis on the modern battlefield:
Key Terrain - Terrain that provides a unique advantage to whoever controls it. Hill Tops, River crossings and other key infrastructure like power plants.
Observation and Fields of Fire - Identified in relation to pieces of key terrain. If I’m on Hill 5280, what can I see from atop that hill? Do I have clear lines of sight to employ my weapon systems?
Cover and Concealment - Cover stops rounds in their tracks while concealment obscures you from view of the enemy. Concealment is not always cover, but cover typically offers some degree of concealment.
Obstacles - Usually used to slow the enemy down and encourage them to alter their route to one that has fewer obstacles. This includes things like tank traps, dragon’s teeth, tank ditches, concertina wire, and minefields.Can also be used to delay an enemy advance.
Avenues of Approach - The routes you can take to get to certain locations. These include roads, mountain passes, bridges or fordable portions of rivers, etc.
One thing you will notice as you conduct terrain analysis is that you will inevitably have one letter of the acronym directly tied into another letter. This is great, as it helps you fully synthesize what's on the board and how you can utilize it during the game.
Now that you have a general understanding of military terrain analysis, let’s apply it step by step to Turn Zero of Legion. I like to run through this acronym in my head after defining terrain with my opponent and prior to doing any other portion of Turn Zero. That’s how important terrain analysis is.
Key Terrain
Legion is unique in that you discuss what benefits terrain offers prior to the game beginning. As you define terrain, ask yourself what sort of unique advantages each piece of terrain can confer to a unit that controls it. Elevated pieces of terrain that are height 1+ can provide line of sight over top of shorter pieces of terrain. Additionally, placing units behind that piece of terrain may block line of sight and keep them safe from enemy fire.
Pieces of area terrain allow multiple units to be inside of it, granting all of them the advantage of light or heavy cover - a potent position to occupy as it mitigates the movement required to move units between pieces of cover. A piece of area heavy terrain was used extremely well by Luke Cook during his run to the 2023 World Championship title.
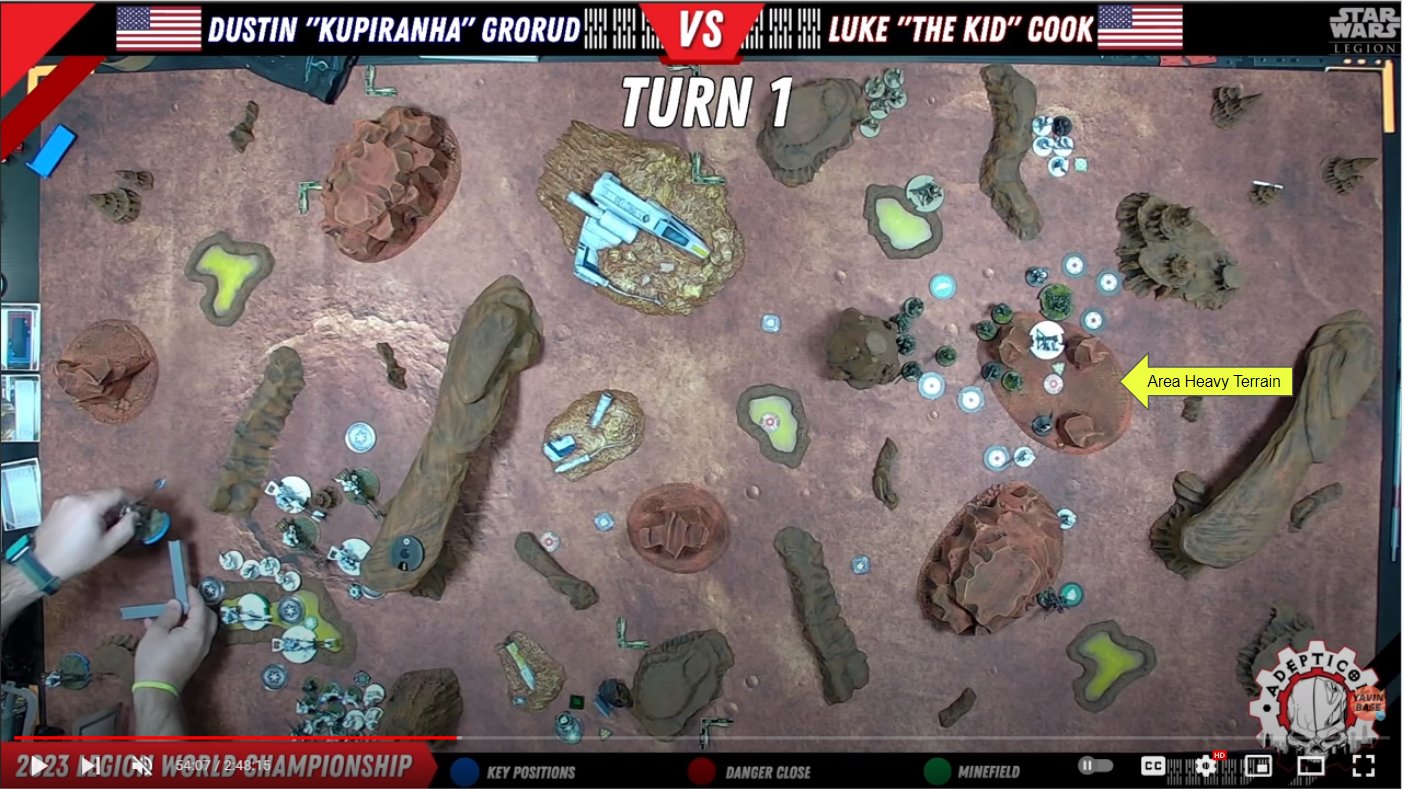
A Piece of Area Heavy Terrain (yellow arrow) used extremely well. Not only is it a Key Position, it’s also providing Heavy Cover to a unit of Shortroopers, 2 Shoretrooper Mortars and IG-88 while simultaneously allowing them to observe the center Key Position. (Check out https://www.youtube.com/YavinBase to watch this stream!)
Pay special attention to the terrain piece closest to the center of the board (objective placement for Key Positions and Intercept the Transmissions objective modes), as those objectives are run quite often. These objectives can turn a seemingly useless crate into a key piece of terrain.
Note that different types of units will benefit from Key Terrain differently. A sniper perch that benefits Scout Trooper Strike Teams will not be as important to a close range unit like Fleet Troopers.
Observation and Fields of Fire
Units in Legion require Line of Sight to their target in order to conduct an attack. As such, the observation and the field of fire a unit has from their position on the battlefield is important. Typical positions with high levels of observation are often height 1+ pieces of terrain, as the additional 6+” of elevation from the board can help observe over the top of smaller pieces of terrain and draw line of sight to units that would be otherwise hidden. Positioning units on elevated buildings may even help get the rare out of cover shots against units that are on ground level.
The field of fire a unit has is the area it can observe (as all units in legion need line of sight to attack) and extends out from its unit leader to the maximum range of its longest ranged weapon. A Black Sun Enforcer unit's field of fire is Range 2 from its unit leader, extending out in the directions it can observe/has line of sight to. Similarly, Iden with her sniper rifle’s field of fire extends anywhere on the table she can observe due to its infinite range. Thus, placing her in elevated positions (key terrain) that enables her to observe the majority of the board can help maximize her impact on the game. Observe the comparison below:
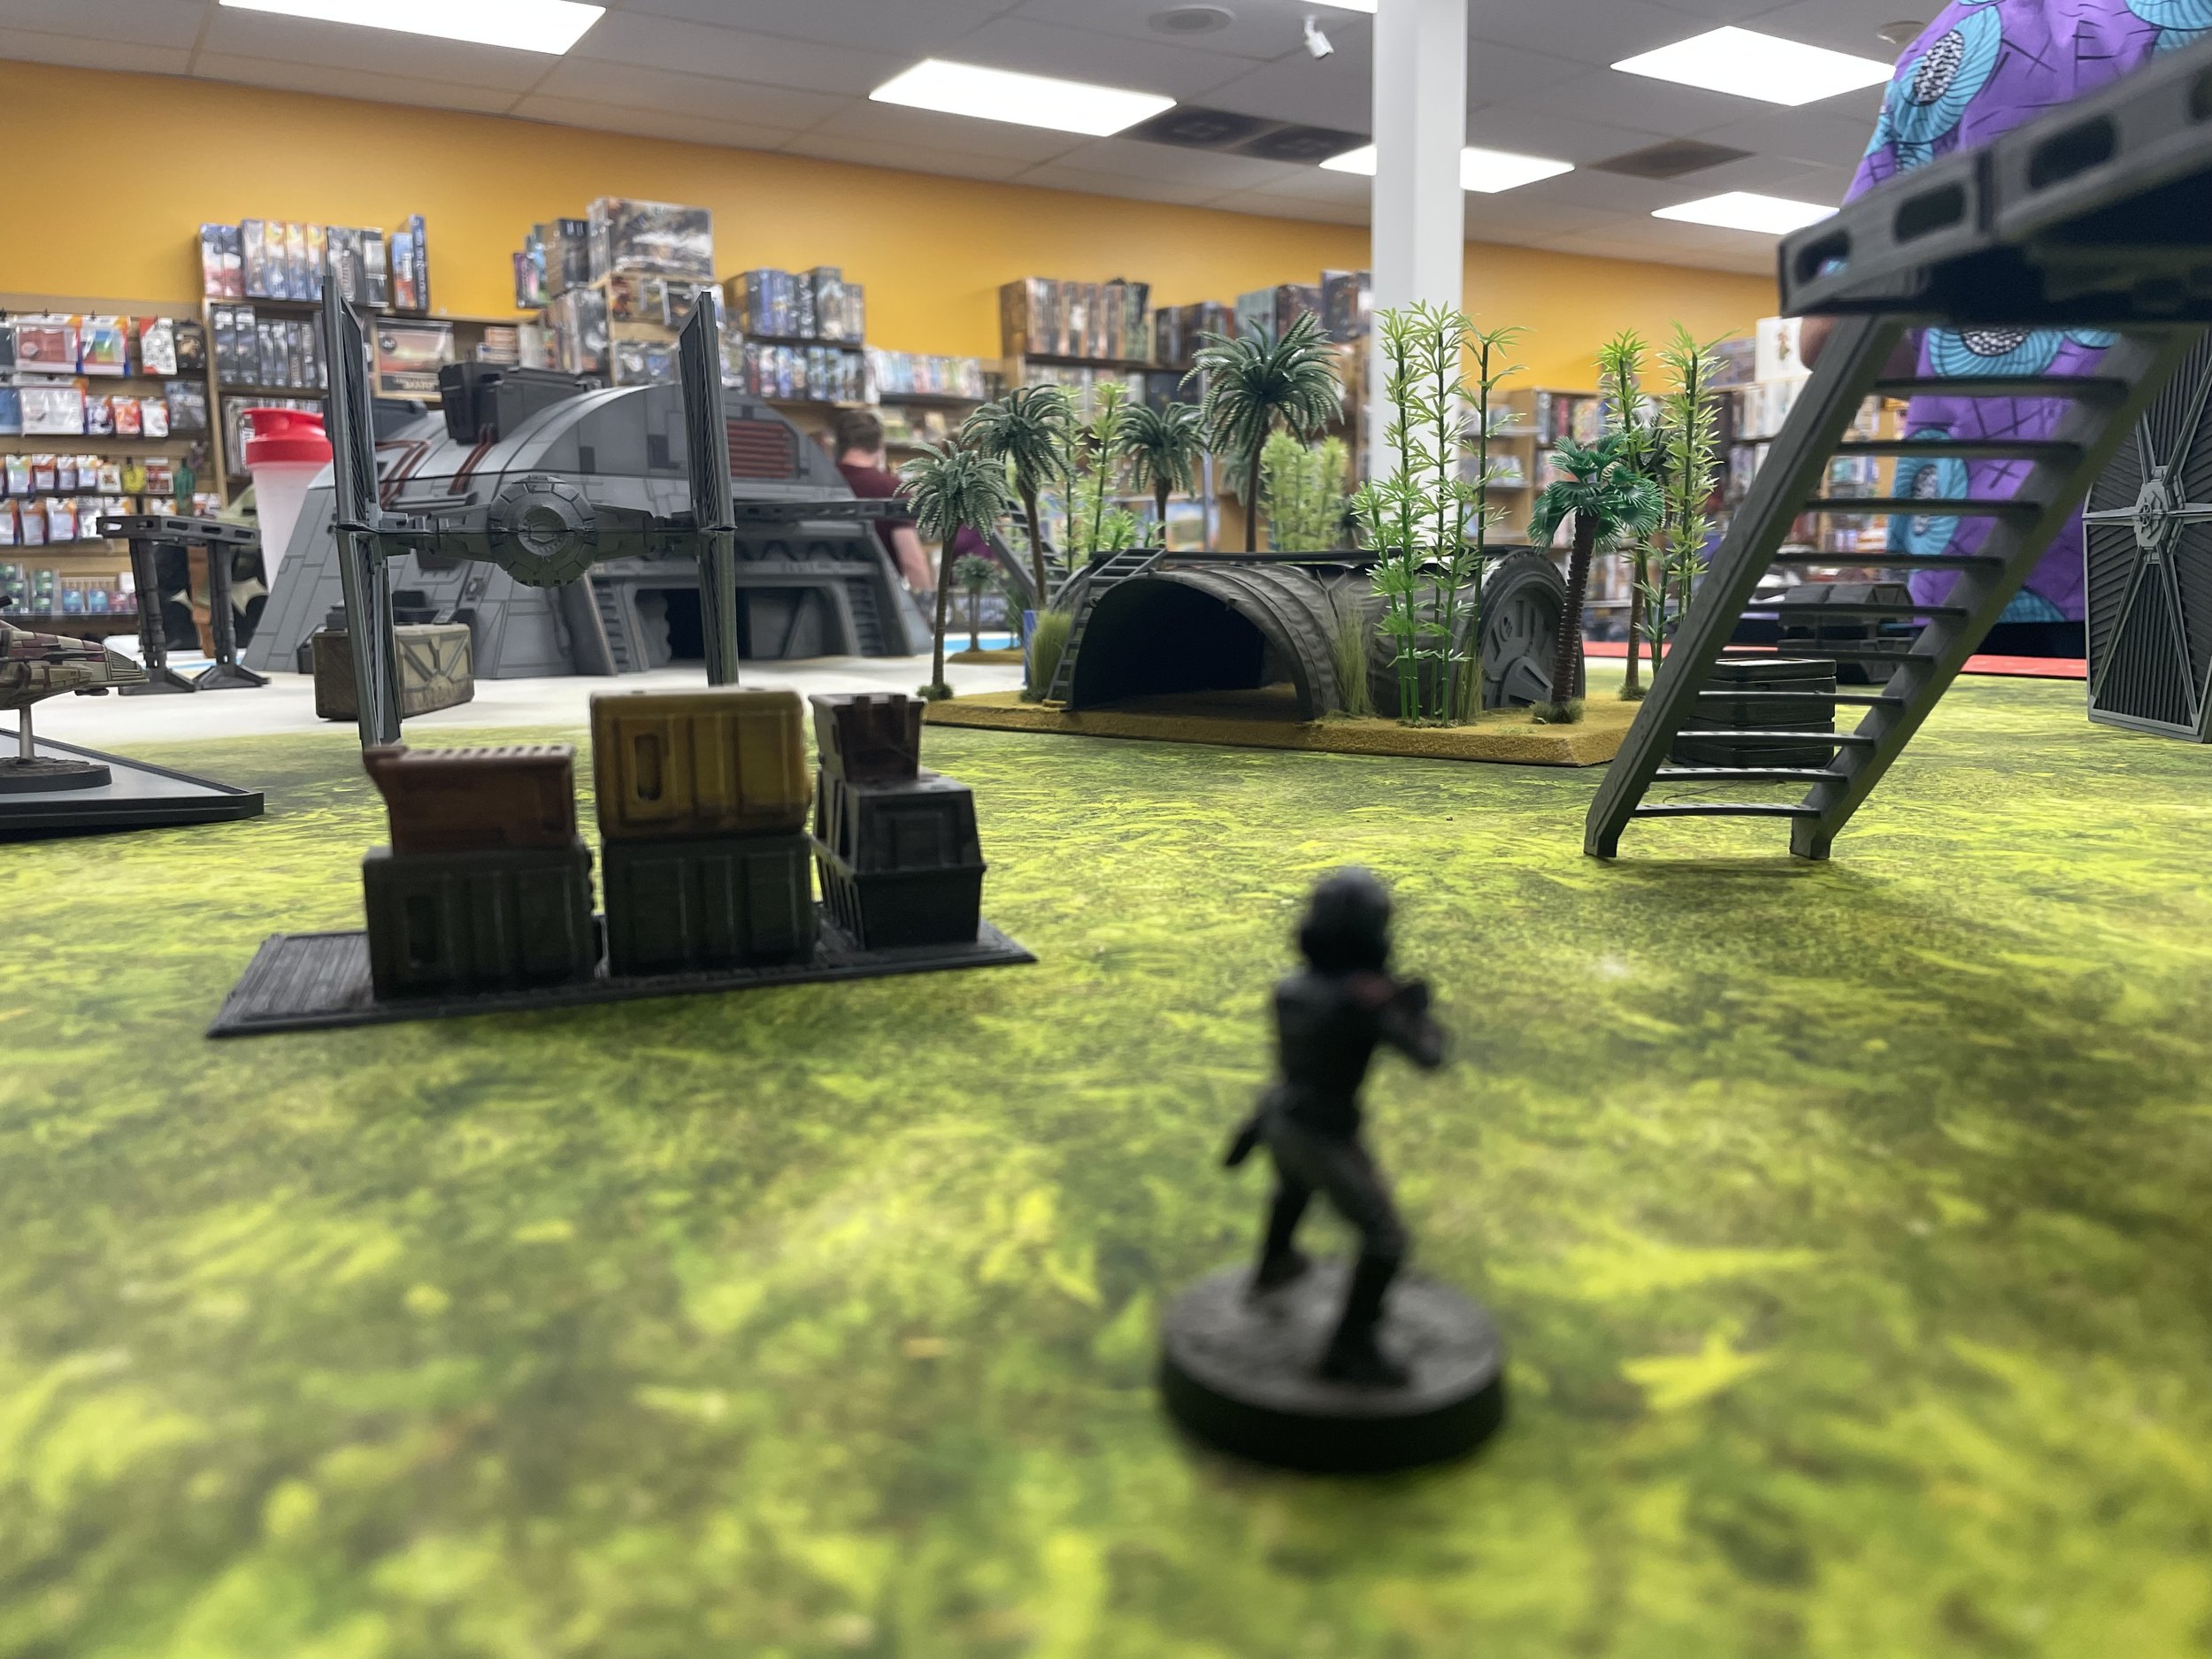
In this scenario, Iden is equipped with her infinite range DLT-20A Rifle. From ground level, Iden can observe none of her opponent’s units, and therefore can not attack any of them.
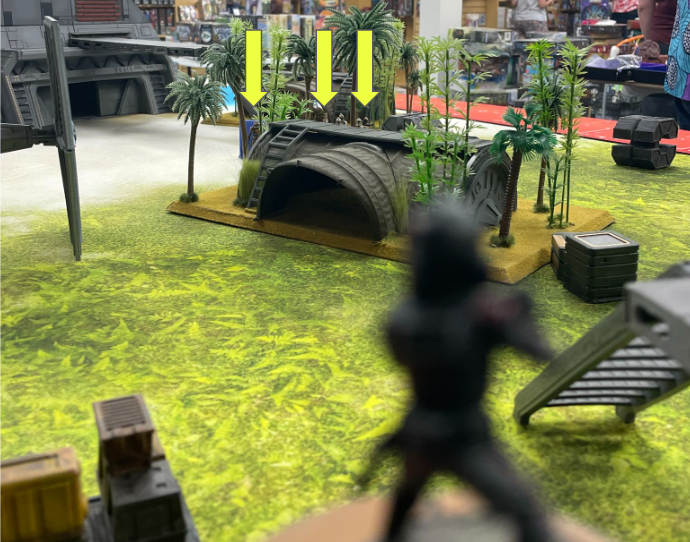
This scenario puts Iden atop a height 1 piece of terrain placed in the same location as she was standing in the first scenario. With the added height, she can now see 3 of her opponent’s units (Clone Commander, Padme and Phase 1 Clone Troopers) that are positioned behind the Area Heavy Terrain (Bunker and palm trees) and therefore can attack them with her DLT-20A.
Units with firing arcs such as Vehicles (AT-STs, Saber Tanks) and Emplacement Units (Shoretrooper Mortars, FD Cannons) are unique in that they have a field of fire limited to the 90 degree frontal viewpoint from their base. This must be considered when positioning them, as the last thing you want to do is be forced to take a pivot action due to your not considering which field of fire was most important for that unit. Fields of fire can be utilized to directly fire on enemy units, to zone avenues of approach via standbys, or to create an impromptu obstacle that makes your opponent have to consider if an alternate route that avoids that standby token is preferable to taking a shot from your unit.
Cover and Concealment
Pretty much any other piece of terrain on the table top can count as cover. Whether it provides heavy or light cover, utilizing cover is key to helping your units get to the objective and win games, as mitigating the incoming fire they receive will help keep your units alive longer.
One thing to consider is how your units will “move from cover to cover”. Once the match’s objective is known and you begin deploying, you should formulate a loose plan in your mind of how you can move your units up the board while mitigating any opportunities for your opponent to get an out of cover shot on them. Use of Line of Sight blocking terrain along the way can be a huge bonus depending on what the unit is. Consider the example below:
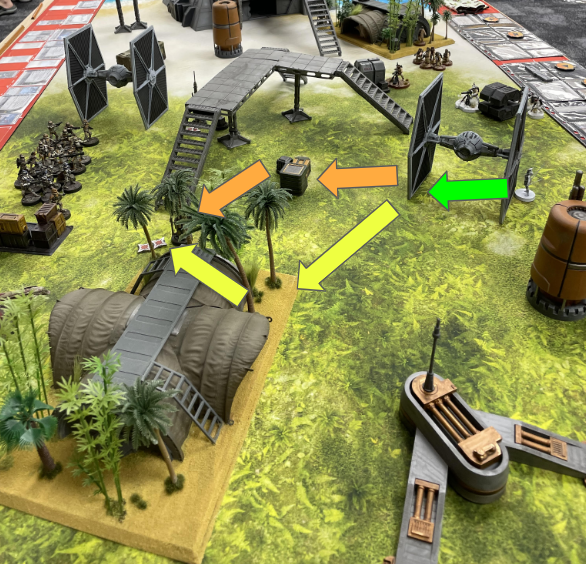
Ashoka is currently hidden from Line of Sight from the opposing Clone Army. To close the distance to the Clones, she can follow the green arrow to stay behind a Line of Sight Blocker on her first activation. She then has two routes to the Clones Moisture Vaporator: The orange arrows expose her to the Clones while giving her heavy cover along the way, while the yellow arrows allow her to use a Burst of Speed to stay out of line of sight until she jumps over the building to get to the Moisture Vaporator.
Any piece of terrain in the game is able to also provide concealment, or in legion terms, obscuration. If any point of a defending mini’s silhouette is obscured from any portion of the attacking unit leader’s silhouette, that mini is obscured. If 50% or more of the defending unit’s minis are obscured, they unit will receive the benefits of light/heavy cover. Use this to your advantage by strategically cohering your units to maximize the obscuration from multiple potential attackers.
The most valuable type of concealment in Legion is when the concealment fully blocks line of sight to your units. If your opponent can not see your units, they can not attack your units. This is extremely important for placing key units such as heroes, hostage carriers, bomb carriers, etc. It will help them stay out of the line of fire longer, minimize their wounds, and help ensure they can accomplish whatever mission you have in mind for them.
Obstacles
Can it slow down units? Does it prevent my units from taking the most direct route to their target? Does moving through/atop it reduce my movement speed? Can going through it damage my units? If yes to any of the above, then that terrain is a form of obstacle.
Barricades, climbing over buildings, and pieces of difficult terrain can all slow down units and should be viewed as a type of obstacle. While not every obstacle has to be avoided, it should be considered when determining how you will move your units around the board. Pre-planning a turn 6 dive to the center Key Position is a lot easier when you start turn 1 knowing that your list can or can not afford to go through any obstacles.
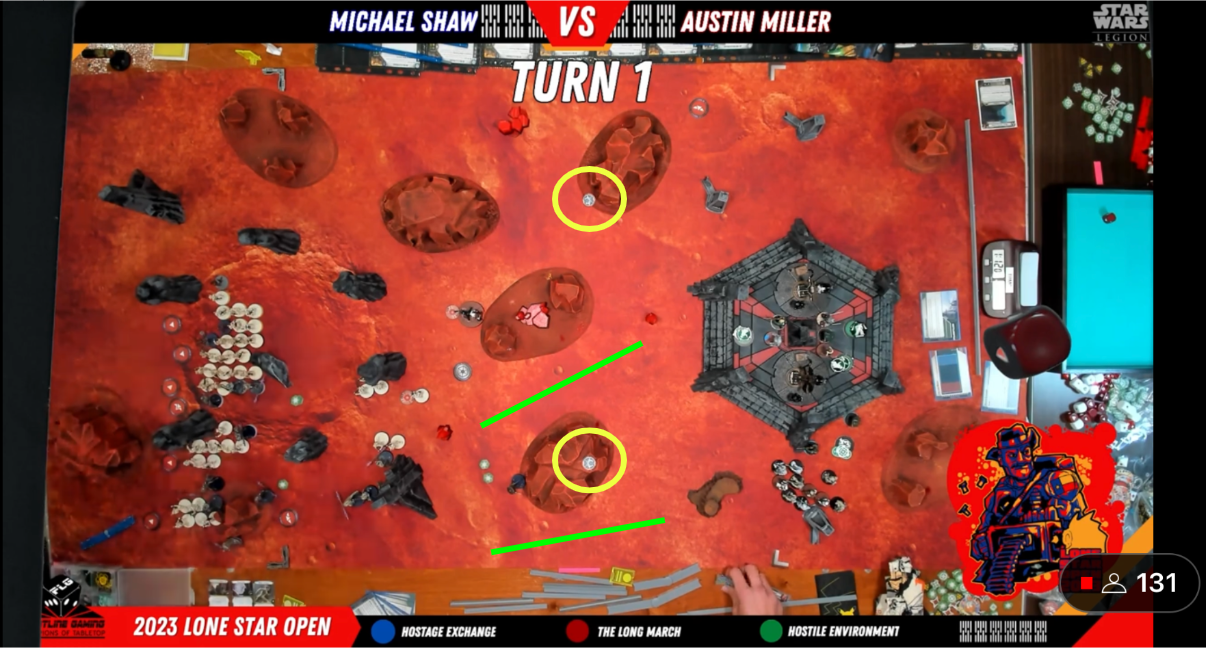
Mines and bombs are one of the trickier forms of obstacles in Legion. They may not explicitly slow you down, but bombs can dish out wounds and suppression to your approaching units. If the “Minefield” condition is chosen, consider placing your bombs in ways that address the other elements of KOCOA. Utilize them to limit your opponent’s use of cover/concealment, to place them in prime observation positions in order to dish out wounds to units that want to occupy those positions or to riddle the route to an objective with bombs. Even if the bomb goes the entire game without exploding, it will have been a success if it altered your opponents route to the objective and forced it into an approach route that is more favorable for your Army to counter. Consider the example below utilizing Cad Bane tokens:
The two circled tokens are Austin Miller’s Cad Bane Tokens - one is a blank token and the other is a bomb. Based on terrain analysis, which one do you think is the bomb? (Check out https://www.youtube.com/YavinBase to watch this stream!)

The bottom yellow circle is the Bomb. Its location makes the first of Michael’s units wanting to use that piece of terrain to have to take a hit from a bomb or to move around the bomb to avoid it. The only way to avoid it entirely is to go above or below it (green lines). The top green line forces Michaels units mid-board into an open area that provides no cover, opening him up to multiple shots from Austin’s Army. The bottom green line route takes Michael’s units away from the center of the board and puts them in a position that is less threatening to Austin’s Army. This makes the bomb placement effective even if it doesn’t explode or do much damage.
Avenues of Approach
These are the routes units can take to get to their desired location. Base sizes are important here, as Trooper sized bases can go places Ground Vehicle Bases (think AT-ST or AAT) can not. Furthermore, Repulsor Vehicles (T-47s or Speeder Bikes) or uints with Jump X that ignore terrain of a certain height can take routes that normal units can only dream of.
Terrain will greatly affect these avenues as large buildings, difficult terrain, and impassable terrain can all influence what is the quickest or safest way to your (and your opponents) desired location.
Identifying these routes can help you pre plan your units’ movement to objectives,to establish new firing lanes, or plan a retreat to safety after securing a box during Recover the Supplies. To truly maximize the use of avenues of approach, layer obstacles atop these routes. Placing friendly barricades to put cover in an open area of your ideal route or placing mines in the middle of your opponent’s preferred route can greatly impact the game state and help you sway outcomes in your favor. Assessing the avenues of approach your opponent might use will help you predict their gameplay and plan to respond accordingly.
Conclusion
Tying together the different aspects of KOCOA is where the real magic happens. Identifying key terrain is just the start. How can I secure that piece of terrain? Do the observation and field of fire benefits it provides make it worthwhile for me to secure it? What sorts of cover and concealment can I utilize en route to that key terrain? What obstacles are in my way, and what obstacles can I employ to make my opponent have a more difficult time capturing it before I can? What avenues of approach can I take that maximize my cover and concealment while avoiding obstacles and providing quality firing lanes? This synthesis will come with practice, and following an acronym will help ensure you never miss a key piece of terrain analysis during Turn ZERO.
KOCOA can be utilized to take your Turn Zero and beyond to the next level. Military leaders will spend hours and write pages of information on each consideration, but as Legion players, we have to run through terrain considerations in mere minutes (if that!) during Turn Zero, as well as constantly reassess it throughout play as the game state shifts. Start your KOCOA usage small, and make it a goal to identify one key consideration for each letter of the acronym. As you become familiar with it, you will be able to synthesize the attributes of each letter of KOCOA enabling you to form a more cohesive game plan on your way to conquering the galaxy.
Written by Philip Samuels (@Phil)
Edited by Stephen Cobb (@ASpaceViking)
Credit to YavinBase for the stream screenshots